Eavestrough Guards in Canada: Types, Costs, Performance in Snow, and How to Choose the Right System
A Winter-First Framework for Comparing Options Without Getting Oversold
By
Published: March 17, 2026
Credit: Homeowner.ca
Key Takeaways
•The “best” eavestrough guard is the one that matches your debris type (maple leaves vs pine needles), your winter freeze–thaw reality, and how much maintenance you’ll actually do.
•In snowy regions, rigid metal covers and premium micro-mesh systems tend to hold up better than lightweight plastics and insert-style solutions.
•Eavestrough guards can reduce clogs and cleaning frequency, but they’re not a substitute for good attic insulation/air sealing/ventilation if ice dams are your recurring problem.
If you’ve ever watched spring meltwater spill over the edge of your eavestroughs like a waterfall, you already understand the problem eavestrough guards are trying to solve: keep water moving, keep debris out, and keep you off a ladder as often.
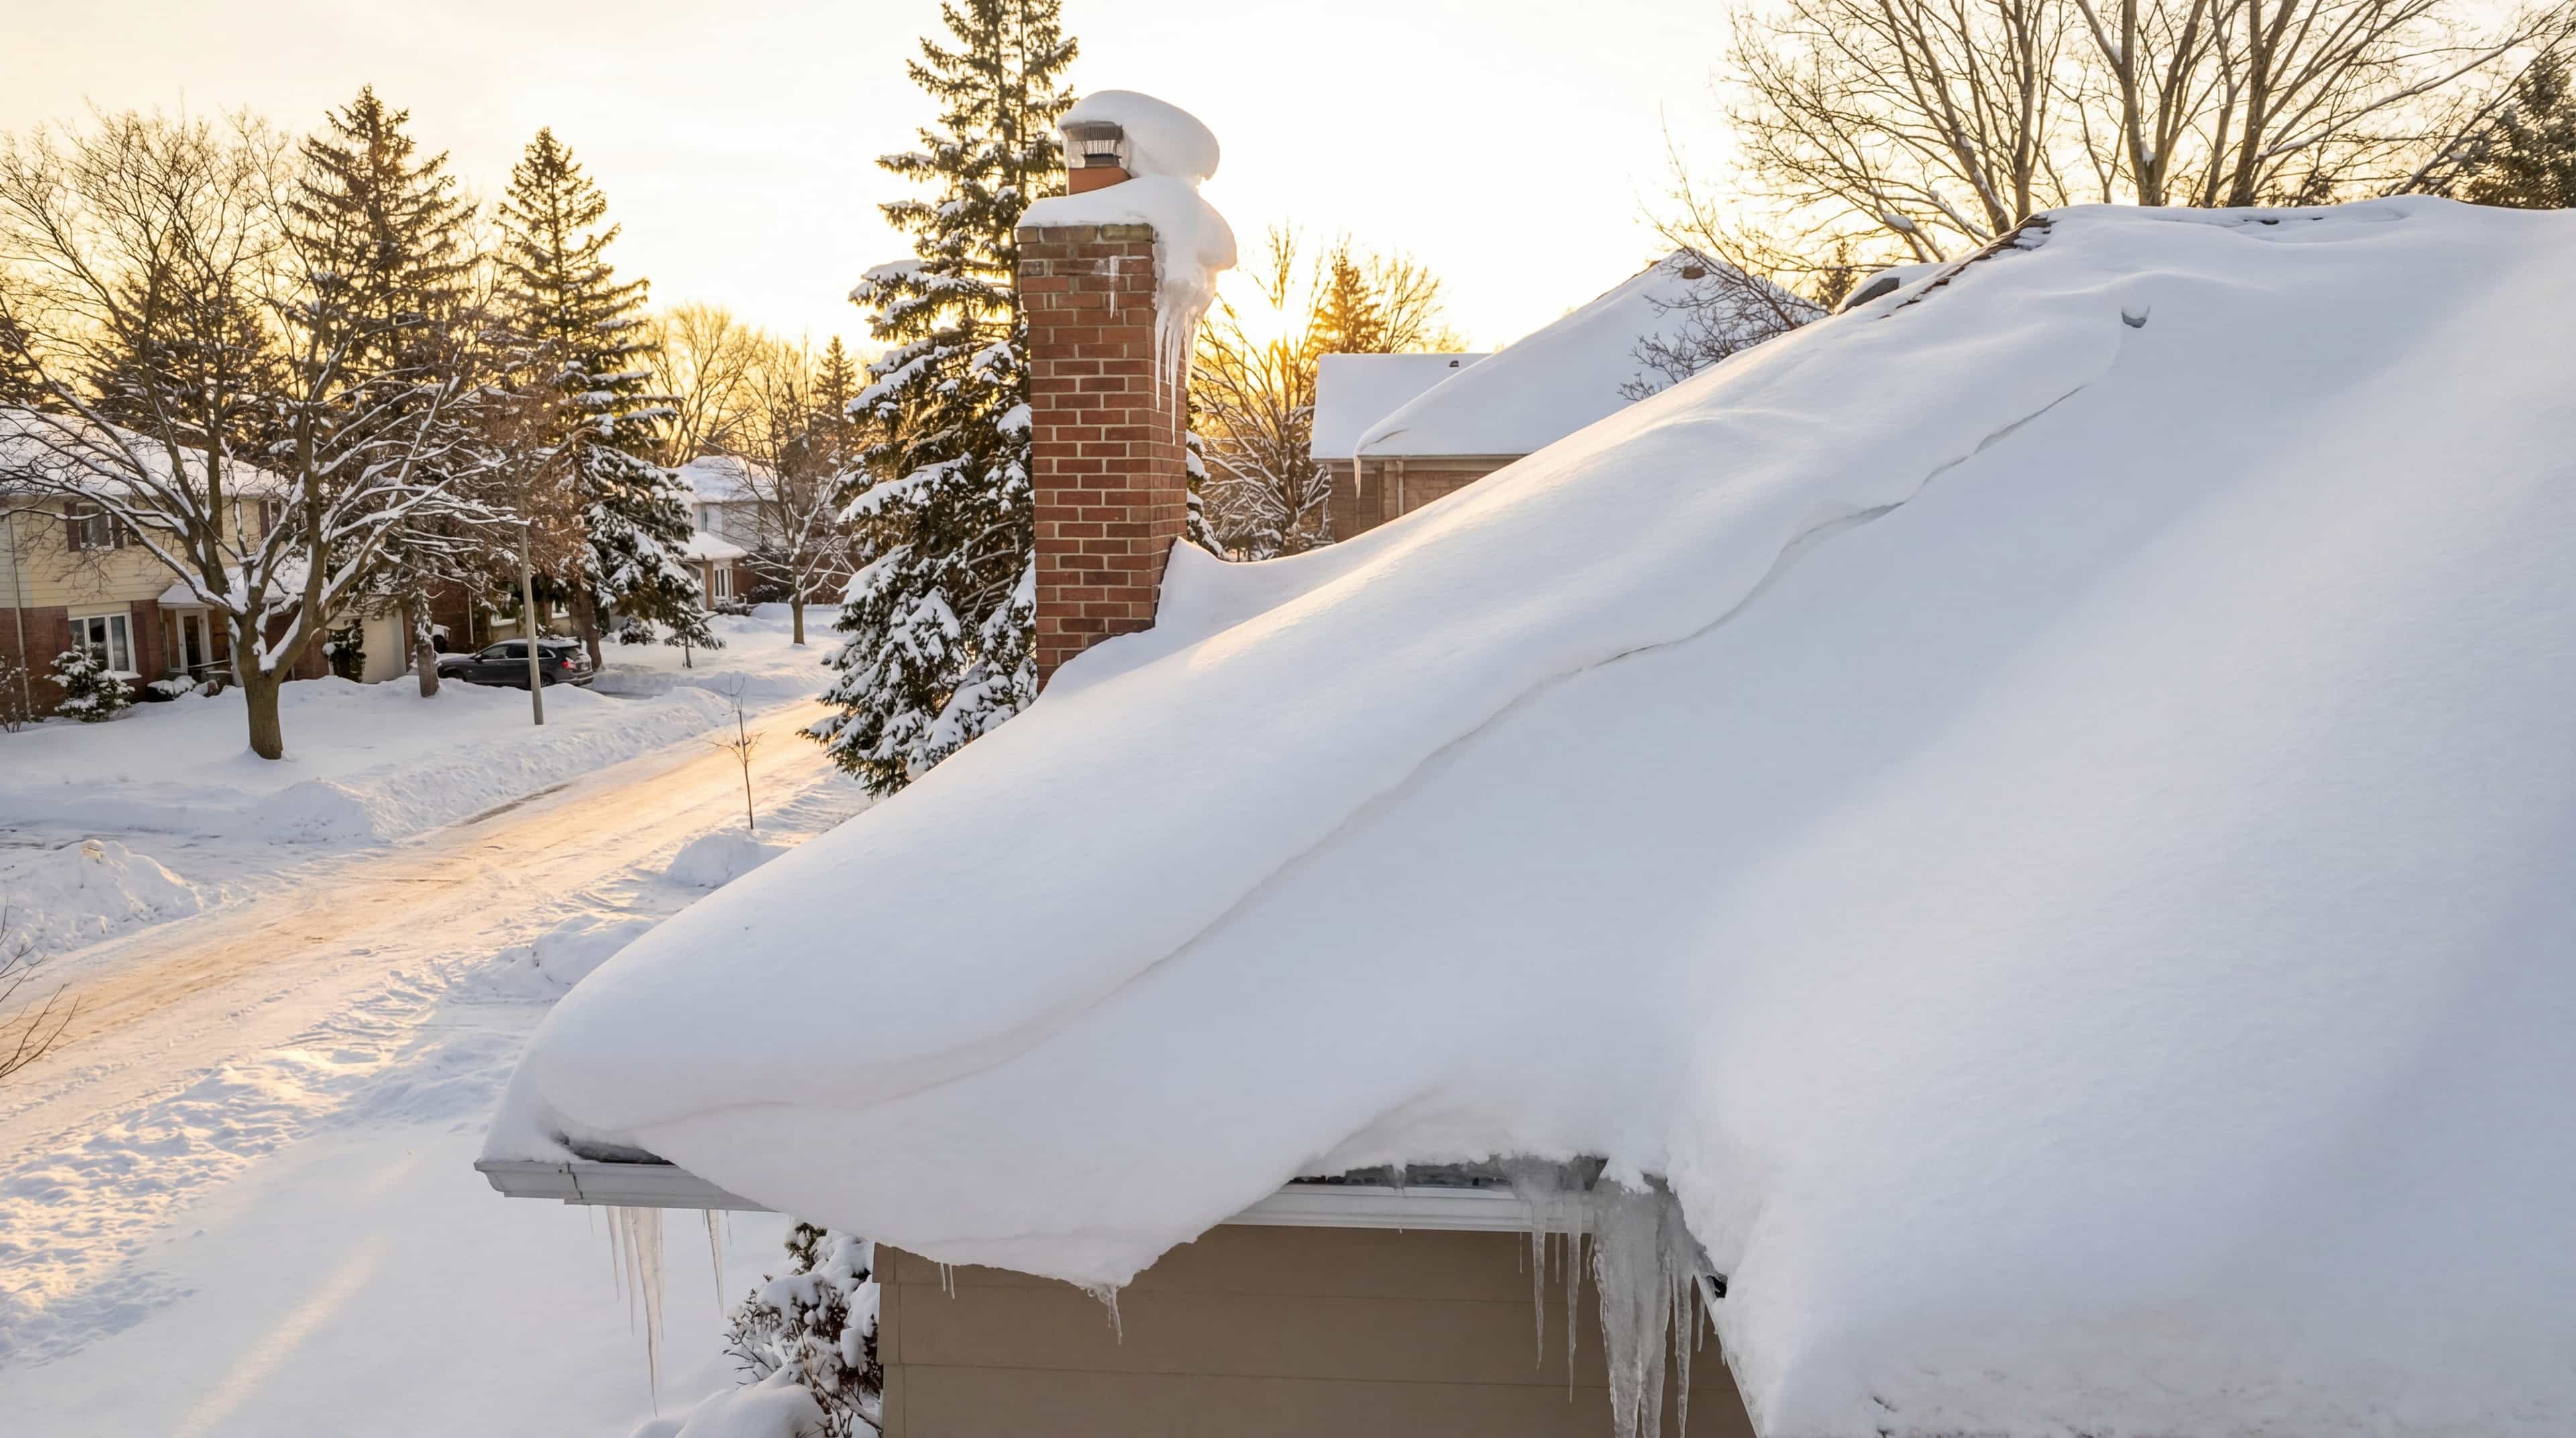
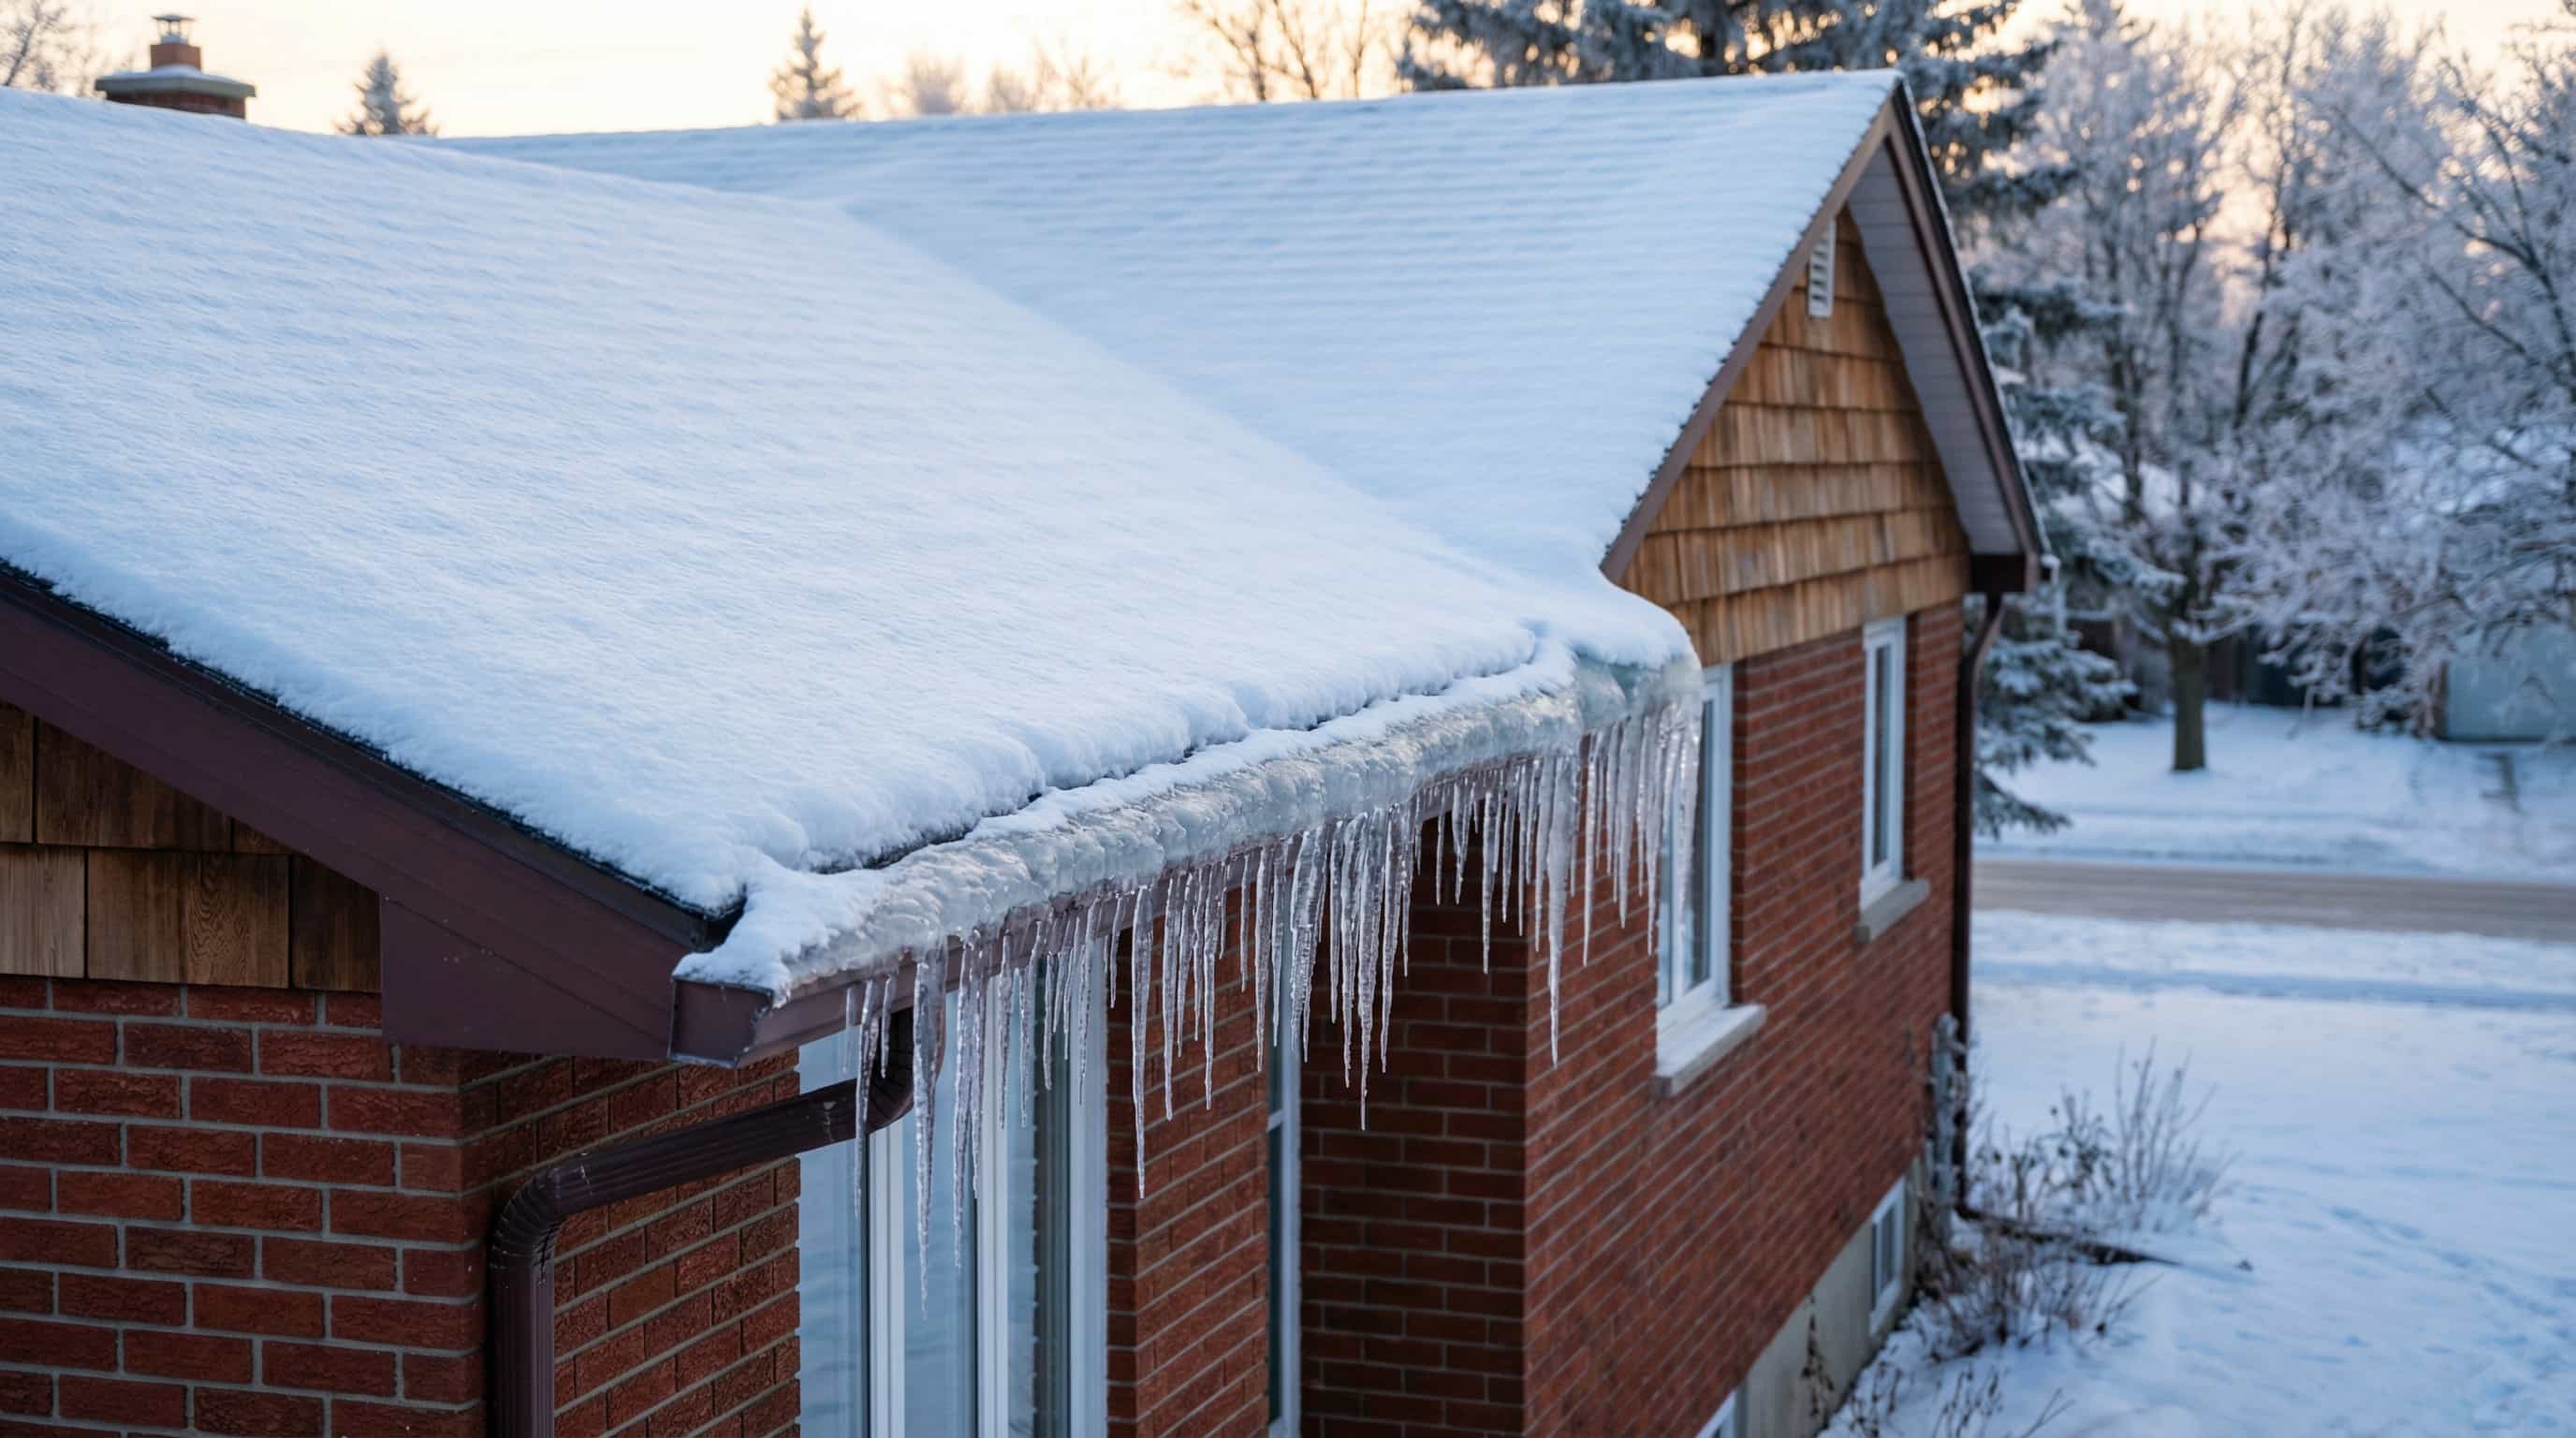
In Canada, that goal is complicated by reality. Our debris loads can be intense (maple leaves, “helicopter” seeds, spruce needles), and our winters add the extra failure mode that matters most: water that doesn’t drain becomes ice. Ice expands, warps, and cracks. Then thaw comes, and suddenly you’re managing overflow, foundation splashback, and sometimes leaks.
This guide is built to help you compare guard types the way a practical homeowner would: not by marketing claims, but by how each design handles your mix of debris, snow, ice, and maintenance habits—plus how much it typically costs to buy and install in Canada.
You’ll also get a selection framework, installation pitfalls to avoid (because installation quality often matters more than the product), and a large FAQ to pressure-test your decision before you request quotes.
Advertisement — Article Continues Below
Eavestrough Guards, Defined for Canadian Homes
Terminology, Failure Modes, and What Guards Actually Solve
In Canada, “gutters” are very commonly called “eavestroughs,” and the basics matter because they affect what guard systems can and can’t do: the trough at the roof edge is meant to collect roof runoff and send it to downspouts, and guidance like Upkeep Home Services’ FAQ on eavestroughs and gutter guards highlights both the common Canadian terminology and the seasonal reality that cleaning is typically annual (often spring and fall) with an extra emphasis on keeping eavestroughs and downspouts clear through winter so meltwater doesn’t freeze in place.
That’s the “why” behind guards. An eavestrough guard is a cover, screen, or insert that aims to stop leaves and debris from entering the trough while still letting water in and moving it toward downspouts. When it works well, it reduces clogs, overflow, and how often you need to scoop out sludge.
When it works poorly—or is installed poorly—you can end up with the worst of both worlds: debris still accumulates, water doesn’t enter fast enough in heavy rain, and winter freeze turns trapped water into destructive ice. For a very concrete winter failure mode, Toronto Window Cleaners’ guidance on eavestrough cleaning frequency warns that harsh winter weather can freeze water trapped inside an eavestrough, potentially cracking or breaking sections and allowing water to pool against the home’s foundation.
There’s also a money angle that’s easy to underestimate until you’ve lived it: water management failures tend to show up as basement and foundation problems, not just “annoying overflow.” In the Greater Toronto context, Tip Top Trough’s gutter guard installation overview points to the claim that the average basement water damage claim in Ontario exceeds $10,000, which is a useful reminder that drainage is a risk-management system, not a cosmetic upgrade.
Here’s the most practical way to think about guards: they reduce the probability of clogs and overflow, but they do not remove the need for correct slope, intact troughs, adequate downspouts, and periodic inspection.
What Homeowners Want
What’s Actually Happening
What Guards Can Help With
What Guards Can’t Fix
“Stop leaves and seeds”
Debris blocks the trough and downspout inlet
Reduce large debris entry and slow buildup
A clogged downspout, poor slope, sagging trough, or existing rust holes
“Prevent winter damage”
Trapped water freezes and expands
Keep the channel clearer so meltwater drains faster
Heat loss from the roof edge, chronic ice dam conditions, missing insulation
“No more cleaning”
Fine grit, roof shingle granules, pollen, and moss still accumulate
Reduce frequency and mess of cleanouts
Eliminate maintenance entirely (no system truly does)
“No overflow in storms”
Water can sheet over a clogged or slow-to-admit guard
Some designs improve flow reliability
Badly sized or poorly sloped eavestroughs; undersized downspouts
Important
A guard is a debris-control device, not a drainage redesign. If your eavestroughs slope the wrong way, leak at seams, or downspouts discharge too close to the foundation, solve those first—or you’ll blame the guard for problems it didn’t create.
Advertisement — Article Continues Below
The Main Guard Designs and How They Work
Cover-Style, Micro-Mesh, Reverse-Curve, and Inserts Explained
Most eavestrough guards fit into a few functional design families. You don’t need to memorize brand names to compare them—you need to understand how water is supposed to enter the trough, and what happens when debris, ice, and roof runoff all compete for the same space.
The most useful comparison lens is this: does the system sit on top of the trough (cover-style) or sit inside it (insert-style), and does it block debris by size (mesh), by deflection (hood/reverse-curve), or by “filling the space” (foam/brush)?
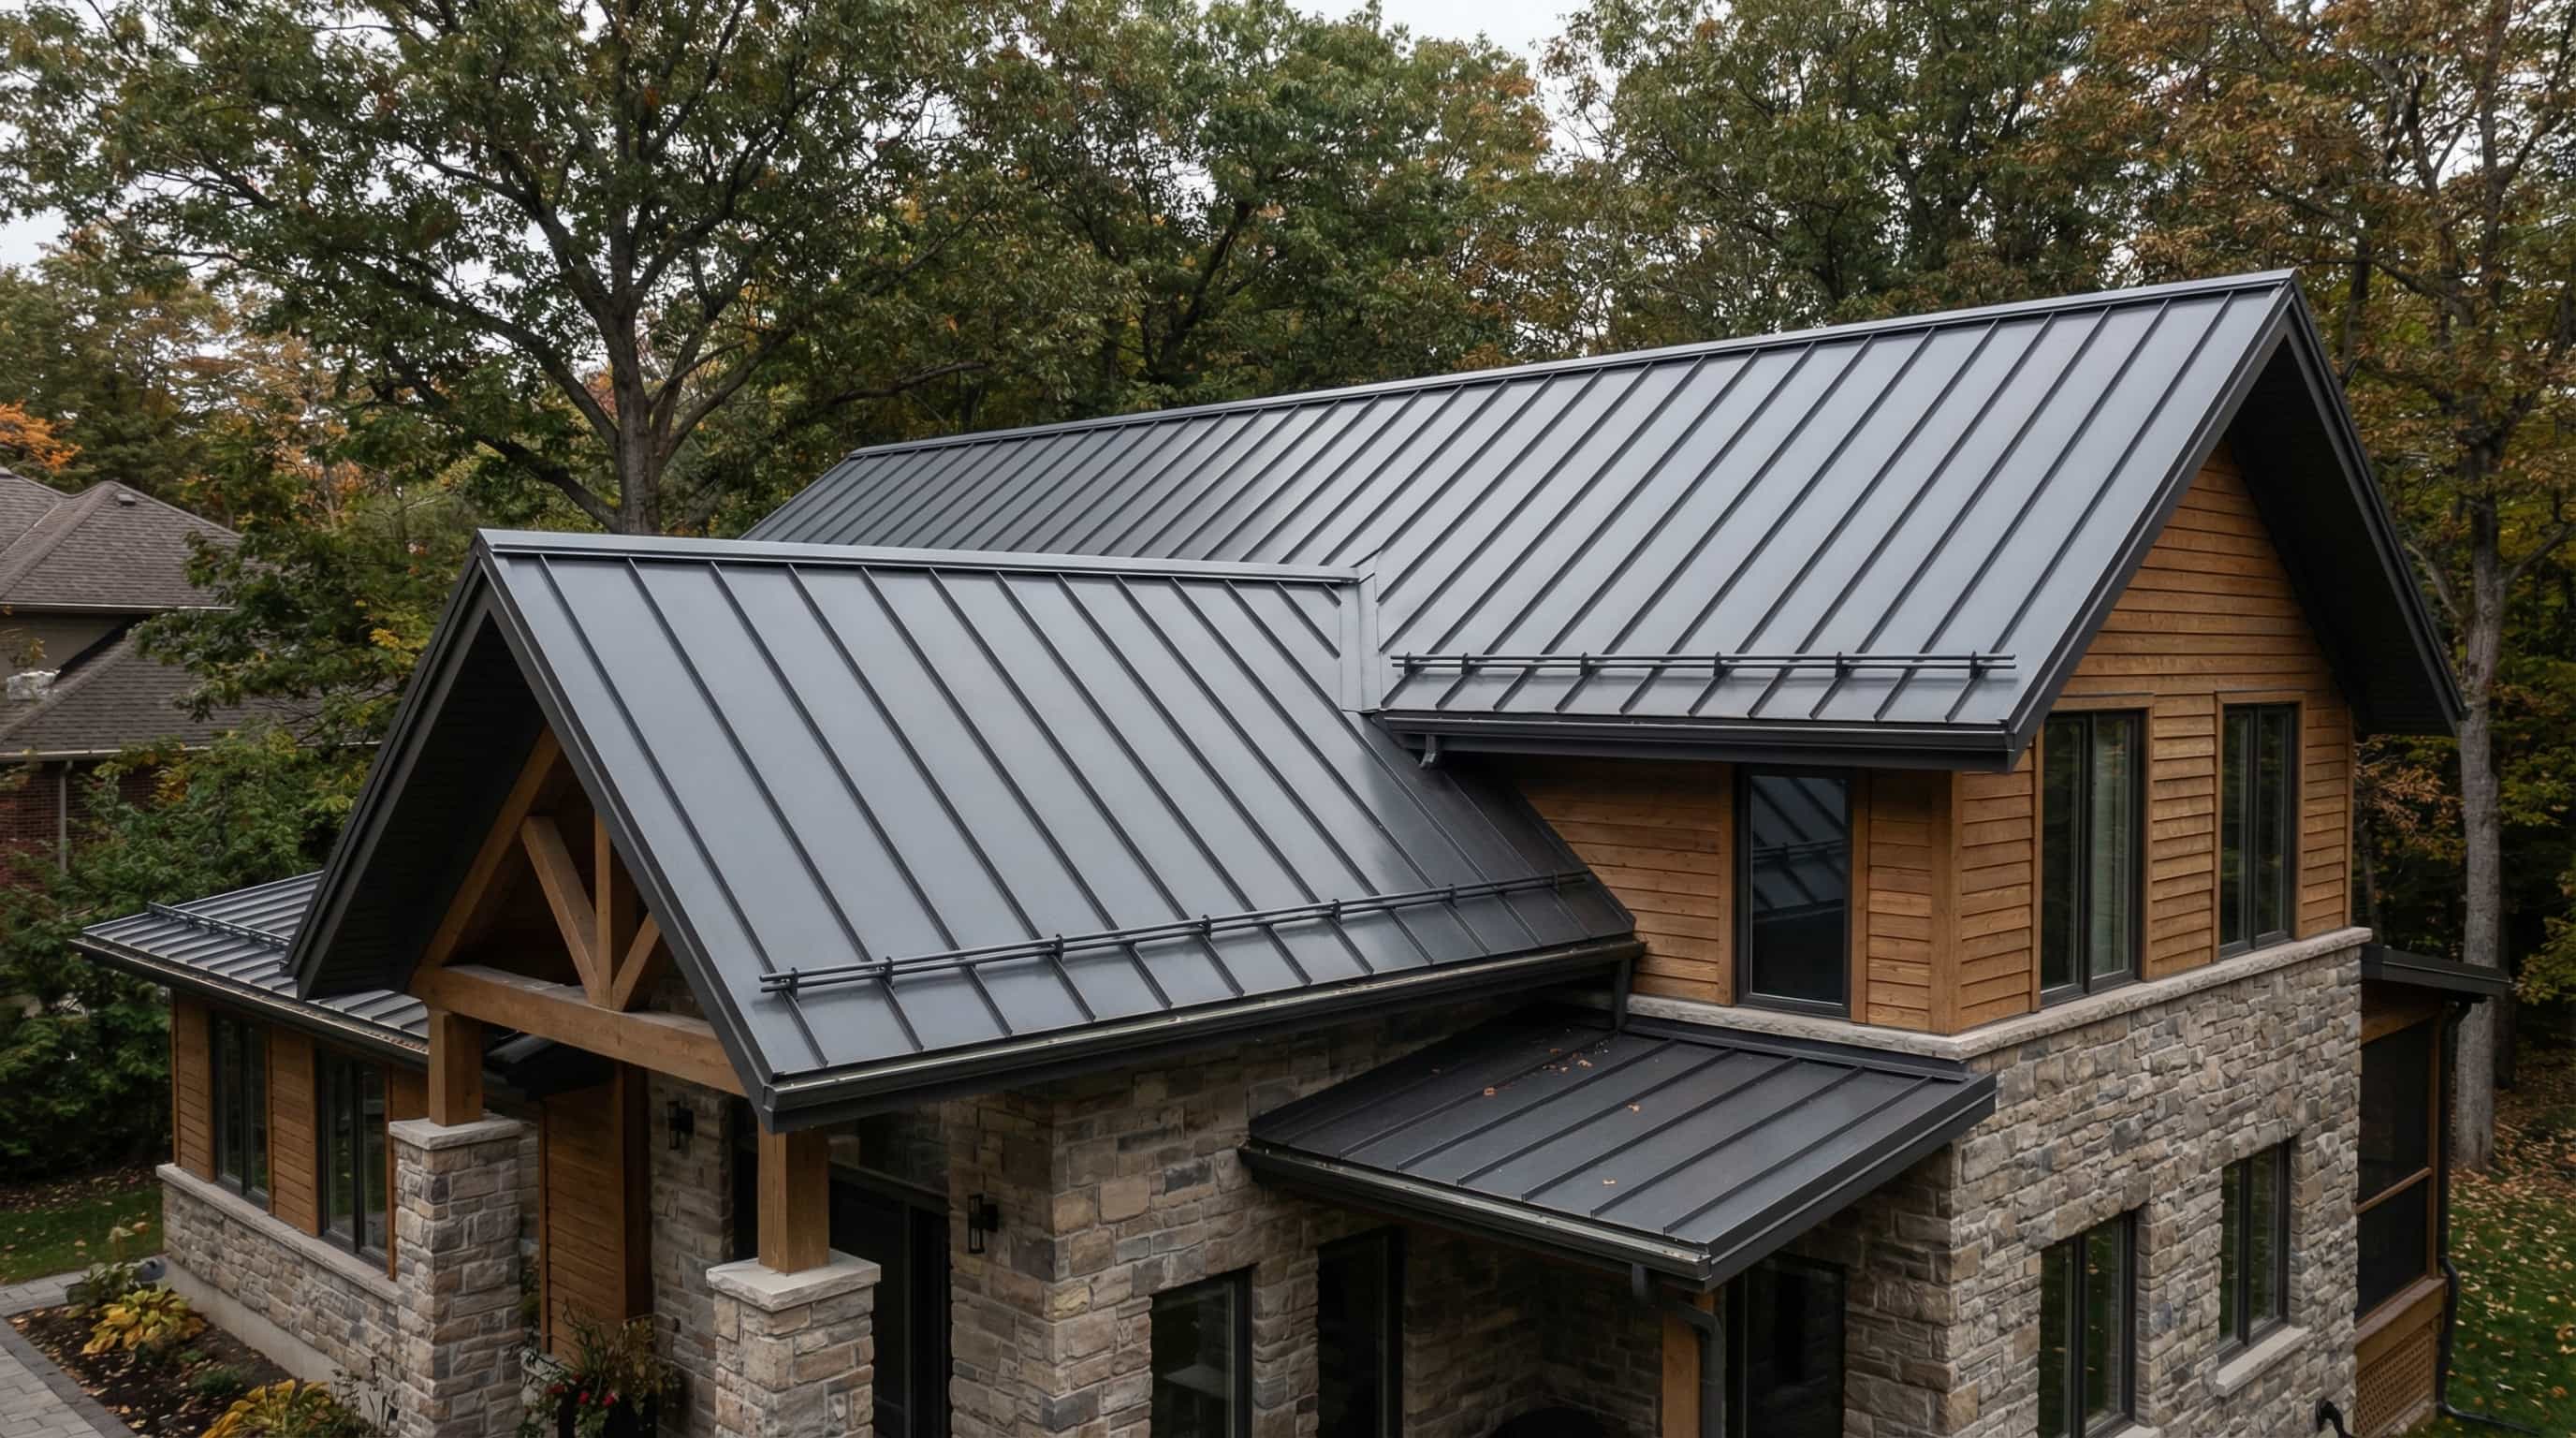
A few Canadian-market examples help clarify what “premium” vs “basic” often means in materials and winter intent. For instance, EavesArmour’s gutter protection overview describes a micro-mesh system using surgical grade 316L stainless steel mesh (30 or 50 mesh) paired with an extruded aluminum frame and also markets an “ICE” offering tied to heated gutters/guards, which is a clear signal of a design aimed at heavy snowfall, corrosion resistance, and winter performance rather than just leaf screening.
On the simpler end, you’ll also see screen-style products positioned for snow and ice alongside debris control. As one example, GutterWare’s Canadian product page explicitly markets protection against debris, snow, and ice while also emphasizing retrofit-friendly installation (including claims about installing without screws on most existing gutters), which is the typical pitch for “stronger-than-plastic, easier-than-full-cover systems.”
Contractor perspectives often sharpen the material discussion: EaveSafe’s gutter guard installation page makes the case for all-aluminum, high-gauge systems in Canadian climates and argues that plastic/vinyl guards can become brittle and fail when water freezes and expands, which aligns with what many homeowners observe after a few hard freeze–thaw seasons.
And because many homeowners start their research at big-box retailers, it’s worth noting how explicitly winter is marketed in Canada: Home Depot Canada’s listing for Alu-Rex “Rain Gutter Protection Maximal Sturdiness” frames its aluminum construction and perforated design around preventing damage caused by ice and snow and helping reduce freeze/thaw-related gutter and roof damage while letting water in and keeping debris out.
With those examples in mind, here’s a practical taxonomy you can use on any quote or product listing.
Guard Type
How Water Enters
What It Blocks Best
Common Weak Spot
Typical Fit in Canada
Micro-Mesh (premium)
Through fine stainless mesh
Pine needles, small seeds, shingle grit (better than most)
Needs correct pitch; can still accumulate fine film on top
High debris + high winter risk + you want long service life
Perforated Aluminum Cover
Through larger perforations
Leaves, twigs, larger debris
Small debris can pass; holes can ice over in bad conditions
Snowbelt-friendly if rigid and well-fastened; good mid/high tier
Screen / Mesh (basic to mid)
Through screen openings
Leaves and larger debris
Can deform; can let in small debris
Moderate debris; careful material selection matters
Reverse-Curve / Surface-Tension Hood
Water wraps around a curved nose
Leaves (with enough flow)
Struggles with certain debris; sensitive to installation and rain intensity
Premium pricing; best when professionally installed and well-matched
Brush Insert
Water flows through bristles
Larger leaves (sometimes)
Traps fine debris; becomes a “filter” you still must clean
Budget DIY; usually not ideal in heavy debris zones
Foam Insert
Water flows through porous foam
Leaves (initially)
Can clog and degrade; hard to clean thoroughly
Budget DIY; short-term thinking unless conditions are perfect
Tip
Match the guard to your debris first, then to your winter. A guard that’s “great for leaves” can still be a poor fit if your real issue is pine needles, shingle grit, or repeated mid-winter thaws that refreeze overnight.
Canadian winter performance is less about “will it keep leaves out?” and more about what happens when snow sits on the roof edge, meltwater runs, then temperatures drop again. The guard you choose changes where water travels, where it slows down, and where ice starts to build.
To ground the winter conversation in reality, consider the scale of snow exposure many homeowners live with:
City Example
What the Climate Normals Suggest
Why It Matters for Eavestrough Guards
Ottawa
The climate normals summarized on Ottawa’s page show average annual snowfall around 232 cm
Long winters plus frequent freeze–thaw cycles put stress on troughs and guard fasteners
Montréal
The climate data shown on Montreal’s page lists average annual snowfall around 210 cm
Repeated thaws can create refreezing at eaves, especially on older homes with air leakage
Québec City
The snowfall melt equivalent referenced in the climate section of Quebec City’s page corresponds to roughly 316 cm of snow annually
Persistent snowpack means longer periods where ice loads and blocked drainage are plausible
The Ice-Dam Myth, Cleared Up
A common homeowner worry is: “Will adding guards cause ice dams?” It’s the wrong framing.
The more accurate framing is: ice dams are primarily driven by roof-edge temperature patterns and refreezing, while eavestroughs (and any guards on them) can influence where that ice accumulates and how fast meltwater escapes. For myth-busting in a Canadian insurance context, ThinkInsure’s ice damming prevention guide explains that gutters do not cause ice dams, but because water freezes there, that’s where they form, and it emphasizes keeping gutters clear while also addressing roof ventilation and insulation.
From another Canadian insurer’s perspective, Westland Insurance’s overview of ice damming lists blocked gutters among the causes because clogs prevent proper drainage and increase the risk of ice accumulation and water backing up under shingles. That’s a useful mental model: guards can reduce one contributing factor (blockages), but they won’t eliminate ice dams if your roof edge is chronically warm and your eaves are chronically cold.
If you’ve dealt with persistent ice dams, the most reliable fixes tend to be “inside the house,” not bolted onto the outside. In an Ottawa-specific guide, Clear Ottawa’s ice dam prevention article emphasizes maintaining an even roof temperature through attic insulation, air sealing, and ventilation rather than relying solely on exterior add-ons, and that logic applies broadly across cold Canadian cities.
How Guards Behave When Ice Shows Up
Most guard failures in winter trace back to one of these pathways:
Water can’t enter fast enough, so it sheets over the guard and freezes at the edge.
Water enters but can’t exit, usually due to a blocked downspout or an ice plug near the outlet.
Snow and ice load deforms the guard, creating gaps or sag that traps debris and water later.
Even when guards don’t “cause” ice dams, they can change the drainage behaviour of ice fragments and refreezing meltwater. As a nuanced technical note, Angi’s explainer on gutters and ice dams states that ice dams can form with or without gutters and that properly installed and maintained gutters can help meltwater drain away, while also noting that guards don’t cause ice dams but some designs can slow the drainage of small ice chunks—making temporary winter removal a consideration in very icy conditions.
Some Canadian products are explicitly positioned around the idea that keeping the trough cavity open in winter is the whole point. For example, Golden Guard’s FAQ states that when snow and ice clog a bare eavestrough it becomes non-functional, whereas with its guard installed snow and ice remain on top of the product and the eavestrough stays functional so water can drain normally during warmups or rain; the same FAQ also claims its aluminum cover helps distribute snow/ice weight and reduces warping caused by ice expansion inside the trough.
Here’s a winter-centric comparison you can use to predict what each type is likely to do when conditions get ugly.
Guard Type
Typical Winter Behaviour
Most Common Winter Complaint
What Often Helps
Micro-Mesh
Generally strong debris control; may develop a thin “film” that affects intake during marginal melt
Slow entry during slushy melt/refreeze
Correct pitch, strong fastening, periodic inspection at warmups
Perforated Cover
Can keep the trough cavity clearer; ice can sit on top
Holes icing over or edge-freeze
Rigid metal, good slope, clear downspouts, insulation/air sealing improvements
Basic Screen
Works until it deforms or gaps open
Sagging, gaps, snow load damage
Better material thickness, better fastening, professional install in snowbelt
Reverse-Curve
Can shed leaves; performance depends on water adhesion and flow rate
Overflow in heavy rain or with certain debris; ice chunk drainage
Professional design match, proper drip edge interface, periodic checks
Brush/Foam Inserts
Can become a debris sponge and freeze within the trough
Still requires messy cleanouts; reduced drainage
Treat as temporary or budget-only, increase inspection frequency
Important
If you get recurring ice dams, treat guards as “clog reduction,” not “ice dam prevention.” The highest-impact work is usually attic air sealing + insulation + ventilation, with eavestrough guards as a supporting measure.
Advertisement — Article Continues Below
Costs and Budgeting in Canada
Turning Per-Foot Pricing Into a Real Project Budget
Most eavestrough guard quotes in Canada can be understood with two numbers:
Cost per linear foot (installed)
Total linear footage of eavestrough run being protected
A useful Canada-wide starting point is the installed per-foot ranges summarized by SRS Roofing & Exteriors’ gutter guard cost guide, which lists typical installed costs (CAD) by guard type and also notes trade-offs like reverse-curve often requiring professional installation and brush guards being easier to install but more prone to trapping fine debris.
Guard Type
Typical Installed Cost (CAD / linear ft)
What That Price Usually Reflects
Screen
$3–$8
Entry-level material, simpler install, more variation in durability
Mesh
$5–$10
Better debris blocking, mid-tier materials, common pro install
Foam
$3–$7
Low material cost, DIY-friendly, higher maintenance risk
Brush
$4–$7
DIY-friendly, but “filters” debris and often needs cleaning
Reverse-Curve
$10–$23
Premium design + professional fitting + more labour
Micro-Mesh
$13–$28
Premium materials, more complex install, longer-life positioning
Toronto and Other Big-City Budget Reality
Per-foot pricing is only half the story. Project totals swing wildly based on access, height, roof complexity, and whether the installer has to repair or adjust the existing system first.
For a Toronto-specific snapshot, LF Builders’ 2025 gutter guard cost guide reports an average gutter guard installation project cost around $1,050 in Toronto, with a wide overall range (roughly $120 to $7,500) and per-foot pricing that varies by material category from low-cost plastics through mesh and up to surface-tension (reverse-curve) “helmet” systems.
Premium Micro-Mesh Benchmarks
If you get a quote that feels “shockingly high,” it may be because you’re being quoted a premium, professionally installed micro-mesh system rather than a mid-tier mesh or cover. In a Canadian consumer guide context, HomeStars’ gutter cost guide cites LeafFilter-type professionally installed micro-mesh systems at roughly $15–$30 per linear foot including installation, which is consistent with the idea that premium systems can be several times the cost of basic guards.
Regional Variation Example
Pricing also varies by region and business model (specialty installers vs general contractors). On Vancouver Island, Rising Tide Gutters’ pricing page lists “No clog gutter guards” at about $10.00 per foot as a guideline price and notes that actual pricing depends on factors like height, corners, and site access, which is exactly why two homes with the same linear footage can get very different quotes.
A Quick Budgeting Method You Can Use Today
To estimate your ballpark budget before you call anyone:
Walk the perimeter and measure your roof edge runs (or measure the eavestrough runs directly if accessible).
Add extra for return corners, dormers, and sections over garages or decks where access is awkward.
Assume higher labour if you’re two storeys, steep roof pitch, limited ladder placement, or winter scheduling.
Example Home Scenario
Linear Feet (Typical Range)
Mid-Tier Budget Range
Premium Budget Range
Small bungalow (simple roofline)
90–140 ft
$450–$1,400
$1,170–$3,920
Two-storey detached (moderate corners)
140–220 ft
$700–$2,200
$1,820–$6,160
Large home (complex roofline + height)
220–320 ft
$1,100–$3,200
$2,860–$8,960
Important
Always compare quotes on the same scope: (a) prep and cleaning, (b) guard supply and install, (c) downspout verification/cleanout, and (d) post-install water test.
The fastest way to choose poorly is to start with a product name. The fastest way to choose well is to start with your constraints.
Here’s a framework that works whether you’re shopping DIY guards at a retailer or comparing professional quotes.
Start With Debris: What Actually Falls On Your Roof?
Different debris behaves differently:
Large leaves (maple, oak) tend to mat and form a “roof” over openings.
Small needles (spruce/pine) behave like stitching needles: they sneak through larger screens and can create dense clogs.
Seeds and blossoms are small enough to pass through many perforated designs, then accumulate as sludge.
Roof granules (especially on older asphalt shingles) are small and gritty, and can accumulate even with guards.
Your debris profile pushes you toward certain families:
Fine debris (needles, grit) generally favours micro-mesh or finer screens.
Large leaves can do well with covers and some hoods, provided water intake remains reliable.
Then Ask: What’s Your Winter Pattern?
Think in events, not seasons:
Do you get mid-winter thaws followed by deep cold?
Does your roof edge show icicles every year?
Do you see overflow during spring melt even when it’s not raining?
If “yes,” prioritize systems that keep the trough cavity usable under snow load, and pair the guard decision with a plan to keep downspouts functioning.
Check Your Roof Edge and Existing Eavestrough Condition
Before you buy any guard, confirm:
The eavestrough is correctly sloped to downspouts.
Hangers are secure and the trough edge is not wavy or deformed.
Seams are sealed and corners are intact.
Downspouts discharge water well away from the foundation.
Guards do not “fix” these issues, and some guards will highlight them by changing how water enters the trough.
Decide How Much Maintenance You’ll Actually Do
This is where many homeowners overestimate themselves. A realistic commitment might be:
One quick visual inspection in fall.
A check during the first big thaw.
A spring check after seeds/blossoms drop.
Choose a system that still works if you do the minimum, not the ideal.
Use a Simple Selection Matrix
Score your home honestly. Then let the pattern tell you which designs are most likely to fit.
In heavy-snow regions, durability is not a luxury feature. Prioritize: rigid metal, secure fastening, and a design that keeps the trough cavity functional when snow sits on top.
Advertisement — Article Continues Below
Installation Quality and Common Mistakes
The Fastest Ways to Turn a Good Product Into a Bad Outcome
If you want the “unfair advantage” in choosing guards, it’s this: judge the installation plan as hard as you judge the product.
Most guard complaints trace back to a short list of preventable mistakes.
A good baseline for DIY and pro installs is to avoid installing anything over dirty or damaged troughs and to eliminate gaps and misalignment; for example, Pest Policy’s gutter guard installation guidance warns against installing over debris-filled gutters, leaving openings that let debris in, or choosing the wrong guard type for the local debris profile.
Roof Damage Risks: The “Hidden” Installation Failure
Some installation shortcuts can create roof problems that are far more expensive than any guard system. If an installer proposes nailing through roofing components or lifting shingles without a clear, roof-safe method, pause. In a Canada-focused cautionary article, LeafFilter Canada’s guide to gutter guard installation mistakes specifically cautions that nailing guards into the roof or lifting the first row of shingles can damage the roof’s water barrier and shingles.
Prep and Fit Details That Matter More Than People Think
High-quality installs usually share a “boring” discipline: cleaning, consistent alignment, and attention to water pathways. A manufacturer installation guide can be useful as a checklist even if you’re not buying that brand; for example, Golden Guard’s installation instructions emphasize cleaning the eavestroughs before installation, avoiding seams between sections, not installing over certain hanger types, and ensuring adequate downspout sizing in specific debris conditions (including the idea that downspout capacity matters when needles and small debris are in play).
Use this table as a quote-audit tool.
Installation Pitfall
What It Looks Like
Why It Fails (Especially in Winter)
What to Specify Instead
Installing over dirty troughs
Guard placed on top of sludge and debris
Debris becomes trapped “under the system” and water freezes around it
Clean, flush, and verify downspouts before install
Gaps at corners and joints
Visible openings near mitres/end caps
Debris enters at the gaps, then clogs and freezes
Continuous coverage with tight corner detailing
Poor pitch alignment
Guard is flat while trough slopes
Water misses the intake pathway and sheets over
Confirm slope and match guard pitch to trough
Roof penetration shortcuts
Screws/nails into roofing materials
Creates leak paths and can compromise shingles
Use roof-safe attachment methods and flashing-compatible designs
Ignoring downspouts
Guards installed, downspouts untouched
Ice plugs and backups occur regardless of guard
Verify downspout clearance and discharge location
Warning
A “cheap install” that compromises roofing materials is not a bargain. If a contractor can’t explain their attachment method clearly and calmly, that’s your sign to walk away.
Eavestrough guards should reduce your workload, but they work best when you treat them like a system you manage lightly—not a system you forget.
A realistic ownership plan looks like this:
Fall check: Look for valleys or roof edges that drop heavy leaf loads; confirm water can enter and move.
First big thaw: Confirm downspouts are moving water; watch for edge overflow that suggests blocked outlets or frozen sections.
Spring check: After seed drop and early storms, scan for buildup on top of the guard (especially micro-mesh and perforated covers).
Most importantly, pay attention to “symptoms,” not marketing promises. These are common signs you should adjust, clean, or upgrade:
Overflow that appears during moderate rain (not just extreme downpours)
Persistent icicles or ice “lips” at the guard edge
Water stains on fascia or siding beneath the trough line
Dripping behind the trough (often seams or back edge issues)
Wet basement corners after melt events
If you’re not getting the performance you expected, the right next move depends on the failure type:
Debris still getting in: suspect gaps, corners, or wrong guard family for debris type.
Water sheeting over: suspect intake limitations, pitch mismatch, or blocked outlets.
Winter ice plugs: suspect downspout issues and the broader roof temperature pattern.
Important
Treat downspouts as part of the guard decision. A perfectly guarded trough still fails if the downspout is blocked, undersized for conditions, or discharging where water can cycle back to the foundation.
About the Author
Ryan May
Senior Contributor / Founder
Ryan is the founder of Homeowner.ca and a proud Canadian homeowner based in Guelph, Ontario. Over his 25-year career in digital publishing, he has focused on transforming complex information into clear, practical guidance that helps people make confident, well-informed decisions.
Functionally, they’re the same product category. “Eavestrough” is simply the more common Canadian term for the trough that collects roof runoff and sends it to downspouts.
No. They can reduce how often you need to clean and how messy the cleanouts are, but fine debris (grit, pollen, shingle granules) can still accumulate, and downspouts still need to function.
Guards can reduce blockages that contribute to ice buildup at the eaves, but they won’t solve the main driver of ice dams: uneven roof temperatures caused by heat loss and air leakage.
Guards don’t create the roof conditions that form ice dams, but certain designs can change how meltwater and ice fragments move, which can make a bad situation feel worse if the underlying roof-edge temperature issue isn’t addressed.
Pine needles usually push you toward finer mesh (micro-mesh or tighter screens) because needles can slip through larger openings and build dense clogs over time.
Large leaves often do well with cover-style guards or meshes that shed debris effectively, provided water intake is still reliable in heavy rain and during slushy melt events.
Brush inserts are easy to install, but they often behave like a filter that traps fine debris. They can be acceptable as a budget stopgap, but many homeowners find they still require frequent, messy cleanouts.
Foam can block large debris initially, but it can also clog, degrade, and become difficult to clean thoroughly. In many Canadian conditions, it’s best treated as a short-term experiment rather than a long-term solution.
Plastics vary widely, but many homeowners and contractors avoid cheaper plastics because brittleness and cracking risks rise with UV exposure and freeze–thaw cycling. If you choose plastic, treat it as a “monitor closely” option.
Many projects land around four figures, but totals swing with height, access, and complexity. The most reliable approach is to estimate your linear footage and then map it to the guard family you’re considering.
It may include material and install labour, but it might not include cleaning, downspout work, repairs, or disposal. Always ask for the scope in writing so you can compare quotes fairly.
If your troughs are sagging, leaking at seams, or visibly degraded, fix the system first. A guard installed onto a failing foundation tends to amplify problems rather than solve them.
Not always, but downspout capacity and condition matter more once you add any system that changes intake and flow behaviour. If you have overflow or winter ice plugs, downspouts deserve a hard look.
Some systems are DIY-friendly, but height, roof edge conditions, and attachment method matter. If installation involves lifting shingles, working over steep pitches, or managing complex corners, professional installation is often safer and more reliable.
Installing over dirty troughs, leaving gaps at corners, mismatching the guard to the debris type, poor alignment/pitch, and attachment methods that compromise roofing materials.
Reverse-curve systems are sensitive to roof edge geometry, drip edge details, and rainfall intensity. If a salesperson can’t explain exactly how water will be guided into your trough on your specific roof edge, you don’t have enough information.
They can be worth it for chronic problem areas when you’ve already addressed insulation/air sealing/ventilation and still get dangerous ice buildup. Treat them as targeted tools, not a first-line solution.
A well-installed mid-tier metal screen or perforated cover can be a strong balance of cost and performance for moderate debris loads, especially when paired with good downspout maintenance and seasonal checks.