A Practical Winter Routine for Keeping the Outdoor Unit Safe, Clear, and Working

Even in winter's chill, this heat pump proves its efficiency, ensuring comfort and warmth for your home year-round. (Source: PointForm AI)
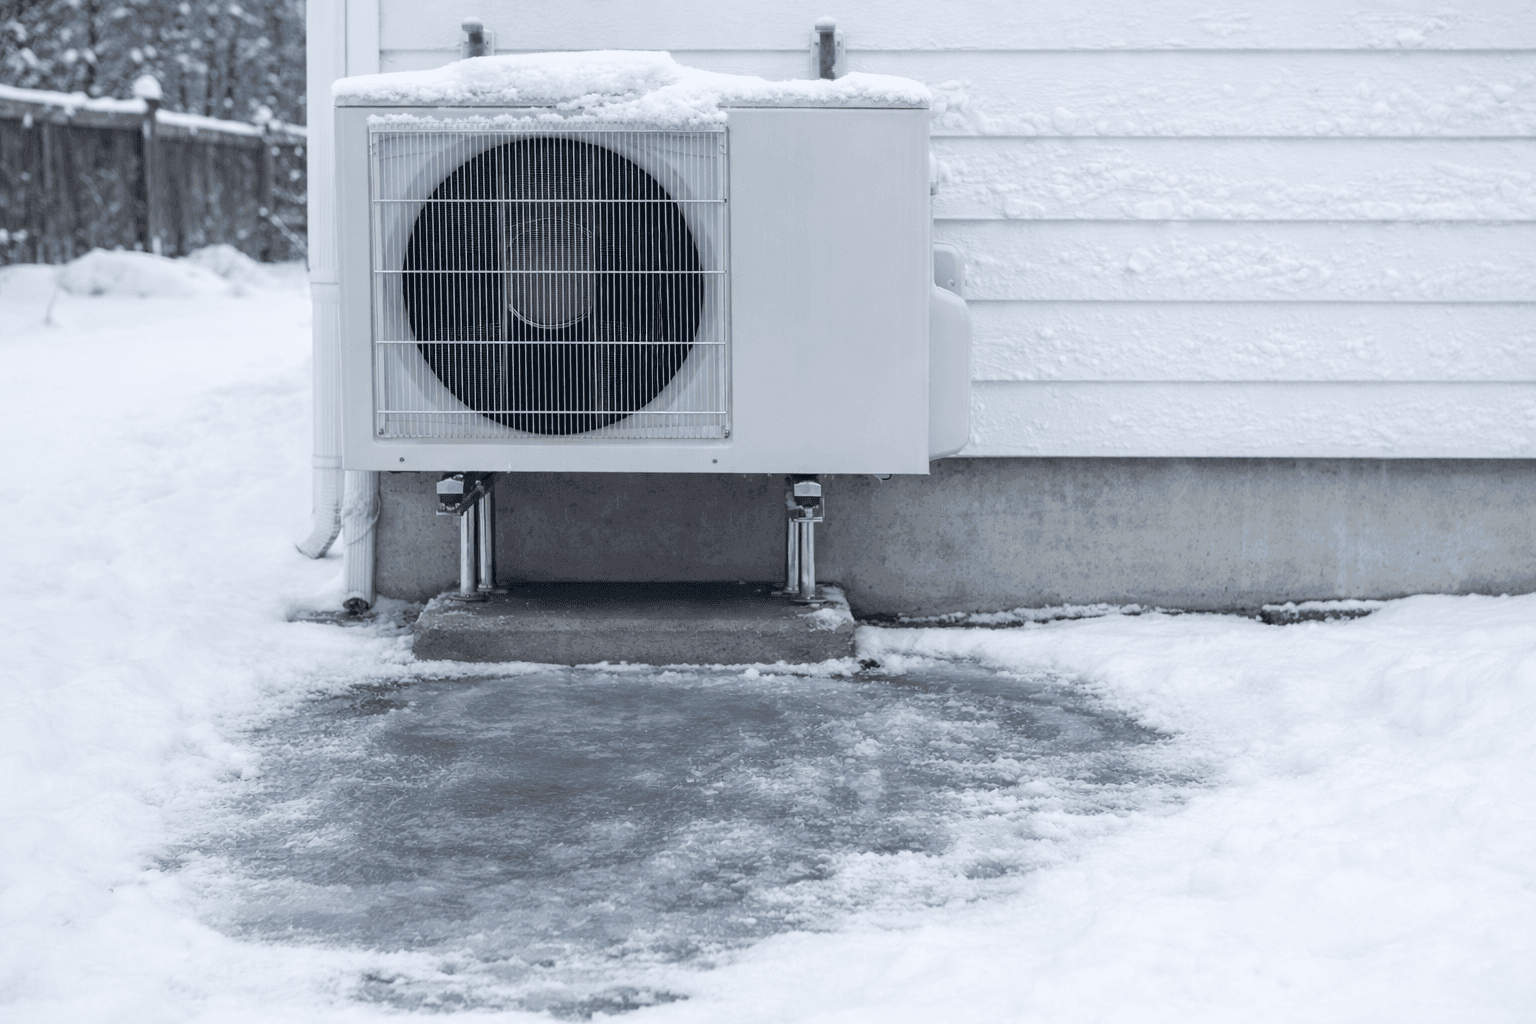
Canadian winters put heat pumps in a uniquely awkward position: they’re trying to pull heat out of cold, damp air, while snow, freezing rain, and refreezing meltwater are working against the outdoor unit every day. The result is that a perfectly healthy system can look “wrong” at first glance—frost on the cabinet, a puff of steam, or the outdoor fan stopping for a few minutes.
At the same time, genuine winter problems are usually not subtle. When a unit gets encased in ice, when snow drifts block the coil, or when roof runoff glazes the fan and coil faster than the system can defrost, you’re no longer in “normal winter operation.” You’re in “equipment damage and slip hazard” territory, and the safest move is often to pause the heat pump and deal with the ice correctly.
This guide is built for homeowners who want a calm, step-by-step way to manage winter risks without overreacting. The focus is narrow and practical: defrost water, ice hazards, clearances, and when to shut the system down. You’ll also get a one-page checklist you can keep on your phone.
A helpful way to think about winter heat pump safety is a simple four-part scan you can do in under a minute:
If you want a quick rule: thin frost is “observe,” thick ice is “act,” and trapped fan blades are “stop.” The sections below break that down into specific, repeatable actions.
In cold weather, it’s common for an outdoor unit to pick up a thin white layer of frost, and New Brunswick’s guidance notes that this light frost should melt off as the unit runs through automatic defrost cycles in normal operation, according to SaveEnergyNB’s heat pump maintenance guide before you ever need to intervene.
What matters is what the frost turns into and what it starts to block. Use this simple “thin vs. thick” test:
Usually normal (monitor, don’t meddle):
Often not normal (prepare to act):
A heat pump can keep your home warm while quietly accumulating a problem outside—so your “comfort” isn’t always the best early-warning signal. A fast outdoor check after storms is one of the highest-leverage winter habits.
Defrost can look dramatic the first time you notice it. You may see vapor rising, hear the system change tone, or notice the outdoor fan stop briefly, and Newfoundland and Labrador’s program explains that these short “odd” moments are a normal part of winter operation in many conditions, as outlined in TakeCHARGE’s Heat Pump Winter 101 guide while the unit clears frost from the outdoor coil.
Here’s what homeowners commonly observe during defrost, and what it usually means:
What you should do during these moments is surprisingly simple: do nothing except observe. The biggest homeowner mistake is interrupting the process (power cycling, switching modes repeatedly, or clearing frost aggressively) because it “looks wrong.”
If you want peace of mind, pick one cold day and actively watch one full defrost event from start to finish. Once you’ve seen what “normal” looks like for your unit, winter operation becomes far less stressful.
Defrost isn’t random; it tends to follow patterns that you can measure. Many systems will run defrost cycles lasting roughly minutes rather than hours, and one practical benchmark described by Shiptons Heating & Cooling’s explainer on heat pump defrost cycles is that cold-weather defrost events often land in the about 5–15 minute range when conditions require it, then the unit returns to steady heating.
A useful homeowner approach is to track two things for one day:
You’re not trying to be a technician—you’re trying to catch the “that’s weird” pattern early. A few red flags worth taking seriously:
“More defrost than heat” is a good plain-language warning sign. If the outdoor unit spends most of its time trying to clear itself, you’re on the path toward heavy icing and component stress.
There’s a clear line between “winter frost” and “equipment-risk ice.” If the outdoor unit is sealed in solid ice—or if the fan blades are effectively frozen in place—guidance from PickHVAC’s ice troubleshooting and prevention guide describes switching to Aux/Emergency heat and turning the heat pump off to protect the fan and compressor before you attempt any de-icing.
Why this matters: a fan trying to spin against ice can break blades, strain the motor, or trigger vibration that damages mounts and panels. A compressor working against a starved, iced-over coil can also be pushed into conditions it wasn’t meant to sustain.
Use this “shutdown threshold” checklist:
Once you shut it down, your next job is to remove the cause, not just the ice. Common causes that repeat unless corrected include:
A heat pump that re-ices quickly after you clear it is telling you something structural: airflow, drainage, or defrost performance still isn’t right. Repeating the same melt-and-restart loop without addressing the cause is how winter damage happens.
When ice buildup is beyond a light frost—especially when it’s thick on the coil area—the safest homeowner move is to shut the unit down and melt the ice without tools. A step-by-step shutdown and de-icing sequence is laid out by NB Power’s heat pump maintenance guidance as a structured way to reduce risk to both you and the equipment.
A practical at-home version of that routine looks like this:
From a safety standpoint, don’t ignore what happens after you melt the ice: the runoff often refreezes. That creates two predictable hazards—an expanding ice pad under the unit and a slippery patch beside it—so plan to manage drainage and walking surfaces once the melt starts.
Keep a bag of traction material (sand or non-clumping kitty litter) near the door you use to check the unit. De-icing often fixes the equipment problem but creates a “slip-and-fall” problem right where you’re standing.
In many Canadian neighbourhoods, the outdoor unit doesn’t fail because of “cold”—it struggles because it can’t breathe. One clear, memorable rule-of-thumb for snowy climates is to keep snow at least 6–12 inches (15–30 cm) away from all sides of the outdoor unit, as recommended in HeatPumps.ca’s Toronto winter tips for heat pumps while also making sure the base or stand isn’t being buried over time.
Make that clearance easy by turning it into a micro-routine:
This is less about perfection and more about consistency. A unit that’s 80% clear most of the winter but gets fully blocked twice during major storms can still end up with heavy icing and a shutdown.
When you clear snow, be gentle with the coil area. The fins are easy to bend, and “helpful” scraping can create a costly repair.
Some winter problems are really “site planning” problems that show up when snow gets deep. Cold-climate placement guidance suggests maintaining generous clearance (often around 24 inches / 60 cm) on all sides and elevating the unit well above expected snow levels so it can drain during defrost, as described in NeutralX’s heat pump selection and placement guide while also planning how you’ll physically access the unit for snow removal.
Even if your unit is already installed, the concepts still help you troubleshoot:
If your home regularly sees deep accumulation (think: drifting side yards, heavy lake-effect snow, or rural lots with wind exposure), it’s worth treating the area around the heat pump like a small “mechanical zone” you maintain all winter.
Elevation isn’t just about keeping the coil out of snow. It’s also about giving defrost water a place to drip and refreeze below the unit rather than inside it.
There are storm scenarios where “keep it running” is the wrong instinct—especially when snow and ice accumulate on top of the unit where the fan and grille are vulnerable. Manufacturer-facing homeowner guidance notes that in extreme weather with heavy snow and ice buildup on the top and fan area, it may be appropriate to turn the heat pump off and rely on auxiliary heat until the buildup is cleared, as stated in a Carrier homeowner manual hosted via Manuals+ to reduce the risk of vibration and component damage.
A safe storm protocol looks like this:
This isn’t about babying the system; it’s about preventing the specific kind of mechanical strain that storms can create—strain that normal defrost operation isn’t designed to solve.
If you hear loud vibration, banging, or a fan “catching,” treat that as a stop signal. Mechanical damage happens fast when spinning parts meet ice.
Some regions—especially coastal and Atlantic climates—spend long winter stretches in the “cold + wet + snowy” zone where icing is simply more persistent. Cold-climate maintenance guidance emphasizes that very low temperatures and frequent defrosting can create more ice in the outdoor unit and that homeowners may need to check and de-ice more often during these spells, as outlined by Ready Refrigeration’s cold-climate maintenance guidelines alongside recommendations like base pan heaters to prevent defrost discharge from freezing and building in the pan.
Use “trigger conditions” to decide when you should check more often:
Also keep the bigger picture in mind: winter maintenance isn’t only about comfort—it protects the unit. If your installer or manufacturer has maintenance expectations (like keeping the unit clear of snow and ice), ignoring those tasks can create costly downstream consequences.
If you’re repeatedly battling base ice, the long-term fix is usually better drainage and better elevation—not more aggressive ice removal.
When you do need to melt ice manually, the goal is to melt it without bending fins, cracking tubing, or soaking electrical components. Homeowner-friendly winter maintenance tips describe using warm water as a gentle de-icing method for mini-split outdoor units, as noted in Atlantic Refrigeration & Air Conditioning’s winter heat pump maintenance tips while keeping the approach cautious and controlled.
Two practical realities make this safer (and more effective):
A safer “finish” after melting ice:
If roof runoff is landing on the unit, fix that first. Otherwise, you’ll keep melting ice that will simply return with the next thaw, drip, and freeze.
Use this as a lightweight routine you can actually maintain through a Canadian winter.
If you only adopt one habit, make it this: check after storms. Most winter failures don’t start on calm, clear days—they start when the unit is buried, blocked, or glazed and keeps trying to operate anyway.
Often, yes. A light, thin frost that appears and disappears is usually just moisture freezing on cold surfaces and then melting during defrost. The key is whether it clears on its own and whether airflow remains open. Thin frost that comes and goes is very different from thick, solid ice that traps the cabinet, blocks the coil, or freezes the fan blades in place.
What you’re usually seeing is vapor from frost melting during a defrost cycle. Cold air plus warm coil surfaces can create visible vapor for a few minutes. If it’s brief and the unit returns to normal operation, it’s typically not a problem. If you see heavy vapor along with loud noises, vibration, or signs of electrical issues, treat that as abnormal and shut the unit down.
Not always. Many heat pumps temporarily stop the outdoor fan during defrost to help the outdoor coil warm up and shed frost more effectively. That pause can look suspicious if you’re expecting constant fan operation, but short fan stops during defrost are common. What isn’t normal is a fan that can’t spin because it’s frozen or jammed.
It varies by model and weather, but it should generally feel like a short event, not something that dominates the hour. If your unit is frequently defrosting for long stretches, or if it seems to be stuck in defrost, that’s a useful signal to call a technician. A quick timing check with your phone can help you describe the issue clearly when you book service.
Shut it down when ice creates mechanical risk or blocks airflow so badly that the unit can’t operate safely. The clearest homeowner shutdown triggers are fan blades frozen in place, loud vibration/grinding, or the outdoor unit being sealed in solid ice. In those cases, switch to backup heat and address the ice safely rather than forcing the system to run.
In most cases, fully covering the unit is a bad idea because it can block airflow. If a cover prevents intake and exhaust, it can cause major damage if the unit runs while covered. If you’re trying to reduce snow loading, a small top-only shelter that doesn’t block the sides may be appropriate in some setups—but avoid improvised tarps and wraps that restrict airflow.
Don’t. The coil fins bend easily, and the tubing behind them can be damaged by force. Chipping ice with a screwdriver, hammer, or pry bar can turn a winter nuisance into a refrigerant leak or a costly repair. Gentle melting methods are slower, but they’re far safer for the equipment.
First, power the system off using your home’s safe shutdown procedure. Then use warm-to-hot water to melt ice gradually, taking care to avoid electrical components. The goal is controlled melting—not blasting the unit or prying ice off. After melting, manage the runoff and refreeze risk by clearing slush away from the base and adding traction on nearby walking surfaces.
Think in two layers: a minimum “operating buffer” and a larger “deep snow buffer.” As a practical minimum, keep noticeable space open on all sides so air can move freely and drifting doesn’t pack against the coil. In deeper snow regions, more clearance and better access paths make winter maintenance safer and easier.
During defrost, meltwater drips from the outdoor unit. In sub-zero weather, that water can refreeze quickly and form an ice pad under the unit. Over time, that pad can grow, tilt the unit, or start bridging into the cabinet area. This is why elevation and drainage matter: you want meltwater to refreeze below and away from critical parts, not build upward into them.
Use backup heat when the outdoor unit can’t operate safely—like when it’s sealed in solid ice, when the fan can’t spin, or during severe storms that pack snow and ice into the fan area. Backup heat is also useful while you’re actively de-icing or clearing snow, because it lets you stop the heat pump long enough to fix the problem without sacrificing indoor comfort.
Homeowners can handle regular checks—clearing snow, watching for dangerous ice, and keeping indoor filters clean—but periodic professional inspection is still important. If your unit has been struggling through winters, short-cycling in defrost, or repeatedly icing, booking a technician visit before the next major cold snap is one of the best ways to prevent a mid-winter shutdown.