Basement Waterproofing Explained: Methods, Costs, and How to Choose the Right Fix
A Canadian Homeowner’s Framework for Diagnosing Leaks, Comparing Solutions, and Hiring the Right Contractor
By
Published: March 19, 2026
Credit: Shutterstock.com
Key Takeaways
•The “right” waterproofing fix depends on how water is getting in (surface water, groundwater seepage, sewer backup, or condensation), not just how wet the basement feels.
•Interior systems usually manage water after it enters, while exterior systems aim to block and redirect it before it reaches your foundation.
•The best quotes are the ones that explain the mechanism, show the plan in plain language, and spell out scope, warranty, and what happens if conditions change.
Basement water problems are one of those homeowner issues that feel simple (“water is coming in”) but are rarely solved by a single universal product. In Canada, the same symptom—damp drywall, a wet carpet edge, a musty smell—can come from entirely different mechanisms, and each mechanism points to a different fix.
Timing matters too. Storms and rapid melt events tend to expose weak points quickly, and the risk is often highest when heavy rainfall and fast snow/ice melt combine, as described in the Government of Canada’s flood preparedness guidance which is why “it only happens a couple times a year” is still a real problem.
The challenge is that waterproofing is a broad label. Contractors can be talking about exterior excavation, interior perimeter drains, sump pumps, crack injection, or simply correcting surface drainage—sometimes all in the same conversation. Without a clear diagnostic framework, it’s easy to pay for the wrong category of solution.
This guide is built to prevent that. You’ll learn how basement water typically enters Canadian homes, how to triage the source (including simple tests that reduce guesswork), what interior and exterior waterproofing methods actually do, what costs usually look like across regions, and how to choose and hire with confidence.
Advertisement — Article Continues Below
Understanding Why Basements Get Wet In Canada
The Five Flood Hazards Behind Most Basement Water Problems
Instead of thinking “leak vs no leak,” it’s more useful to think in hazard types. The Canadian Standards Association (CSA) Group guideline commonly referenced as CSA Z800-18 groups basement flood risk into categories that include overland flooding, sewer backwater, groundwater infiltration, plumbing/drainage failures, and failures tied to improperly installed risk-reduction technologies, as laid out in the Standards Council of Canada notice for the basement flood protection guideline which is a practical way to organize both diagnosis and solutions.
A “fix” exists but still floods (failed pump, wrong discharge, poor installation)
System design, maintenance, redundancy, installation quality
The goal isn’t to self-diagnose perfectly. It’s to get specific enough that you’re comparing quotes for the same type of problem—because “waterproofing” is not one thing.
The Most Common Entry Points In Real Canadian Basements
In Canadian cities, basement flooding and seepage often trace back to a few repeat pathways: surface stormwater and groundwater finding cracks, weak points at basement windows, poor grading, failed foundation drainage (weeping tiles), overflowing eavestroughs/downspouts, sump pump failures, and sewer backup during heavy rain or snowmelt, as explained in the City of Toronto’s basement flooding guidance which reads like a checklist of “how water actually gets to your foundation.”
A helpful way to organize these is a simple system model:
Load: how much water is being delivered to the foundation area (roof runoff, lot drainage, groundwater level)
Path: how water is finding a way in (cracks, joints, windows, porous masonry, service penetrations)
Capacity: how well the home’s drainage systems handle it (weeping tile condition, sump capacity, discharge routing, sewer protection)
Fixing basement water issues is usually about reducing load, blocking path, or increasing capacity—and the best long-term plans often combine all three.
Note
Older homes can have “legacy” drainage details (clay tile drains, aging sump components, unknown discharge routes) that work fine until a few high-load events stack up. If your basement only leaks during extreme weather, that often means your system is near capacity rather than completely failing.
Advertisement — Article Continues Below
Diagnose Before You Waterproof
Separate Condensation From Seepage First
One of the most expensive mistakes is treating interior condensation like exterior seepage (or vice versa). A classic low-tech way to triage is the plastic/foil sheet test: tape a sheet tightly to a suspect wall area and check where moisture forms; moisture on the wall side suggests migration through the wall, while moisture on the room side suggests condensation, as described in the University of Minnesota Extension guidance on basement moisture causes and solutions which is a simple test that can prevent the wrong scope of work.
A practical triage grid looks like this:
What You Observe
Most Likely Mechanism
First “No-Regrets” Next Step
Dampness appears in summer, worse after humid days, little link to storms
Condensation / high indoor humidity
Dehumidification, air sealing, verify cold surfaces
Water appears after rain/melt, especially near wall–floor joint
Groundwater seepage / hydrostatic pressure
Surface water control, then evaluate perimeter drainage options
Wet spots trace to a visible crack or penetration
Localized seepage path
Crack repair evaluation, manage exterior load in the same area
Water comes up through floor drain or lower fixtures
Musty smell in finished walls with no obvious leak
Hidden condensation or slow seepage
Moisture mapping, targeted openings, professional diagnostics
The point is not perfection. It’s to avoid paying for “waterproof paint” when you actually need drainage, or paying for excavation when you really needed humidity control and air-sealing.
A Practical Basement Water Diagnostic Sequence That Mirrors How Pros Think
A disciplined diagnostic sequence keeps you from jumping straight to foundation work. A common approach is to work from roof runoff to lot drainage to foundation drainage and finally to plumbing/sewer pathways, as outlined in the Baseline Inspections basement flooding reference which reflects how multiple small issues can combine to overload the basement’s drainage capacity.
A homeowner-friendly version:
Roof water: eavestroughs clear, downspouts connected, discharge routed away from the foundation
Lot drainage: soil slopes away, low spots addressed, hardscapes not pitching water toward the house
Foundation drainage: signs of weeping tile issues, sump system capacity, discharge routing and freeze risk
Openings and weak points: window wells, penetrations, cracks, joints
Plumbing and sewer: floor drains, fixture backups, signs of backwater, leaks independent of weather
This sequence is valuable even if you hire out the work, because it helps you ask better questions and recognize when a quote is skipping the basics.
What To Expect From A Professional Waterproofing Inspection
A reputable inspection should be structured, not improvisational. Many Canadian waterproofing inspections include a visual review of foundation walls/floors, checks for settlement or wall movement, humidity and moisture measurements, inspection of sump pumps and foundation drains (weeping tiles), and an exterior review of grading, gutters, and downspouts, as described in the Dryspace Waterproofing free inspection outline which is the kind of scope you want to hear in plain language.
Modern diagnostics are also less destructive than people assume. Some companies use non-destructive tools like infrared cameras and moisture meters to locate hidden leaks and cold spots behind finishes, as noted in the Draincom description of its basement waterproofing inspection process which can reduce the need to open large wall areas just to confirm a hypothesis.
If your basement is finished and symptoms are intermittent, specialized leak detection can add clarity. Services that focus on pinpointing moisture pathways often emphasize targeted detection methods rather than immediate demolition, as reflected in the GTA Restoration overview of water leak detection services which is helpful when you’re trying to avoid unnecessary disruption.
Tip
Before an inspection, take a phone video walking the basement perimeter and narrate what you’ve observed (when it happens, where it starts, what the weather was). Contractors diagnose faster when you bring a clean “symptom log,” and you’ll get more comparable quotes when each company is reacting to the same facts.
Start With Surface Water Management Because It Reduces Load
A lot of “basement waterproofing” success comes from reducing how much water ever reaches the foundation. This is especially true for homes that only leak during high-load events.
Key examples include grading soil so it slopes away from the foundation and extending downspouts away from basement walls; guidance commonly recommends downspouts discharge roughly 1.2–2 metres (4–6 feet or more) away from the foundation, as shown in the Government of Canada Flood Ready infographic on reducing flood risk which is a low-cost change that can meaningfully reduce seepage pressure.
Municipal guidance often echoes the same “keep water away first” logic—especially around stormwater management and foundation-adjacent drainage—as summarized in the City of Ottawa basement flooding information which is a reminder that cities see the same failure patterns repeatedly.
A practical exterior “first pass” checklist:
Downspouts connected and discharging well away from the foundation
Soil pitched away (no negative grading against the house)
Window wells clear and draining properly
Sump discharge routed away from the foundation (and not onto a neighbour’s lot)
Driveway/sidewalk slopes not sending water toward the foundation wall
These steps don’t replace true waterproofing when you have groundwater infiltration, but they often reduce the scale (and cost) of what you need next.
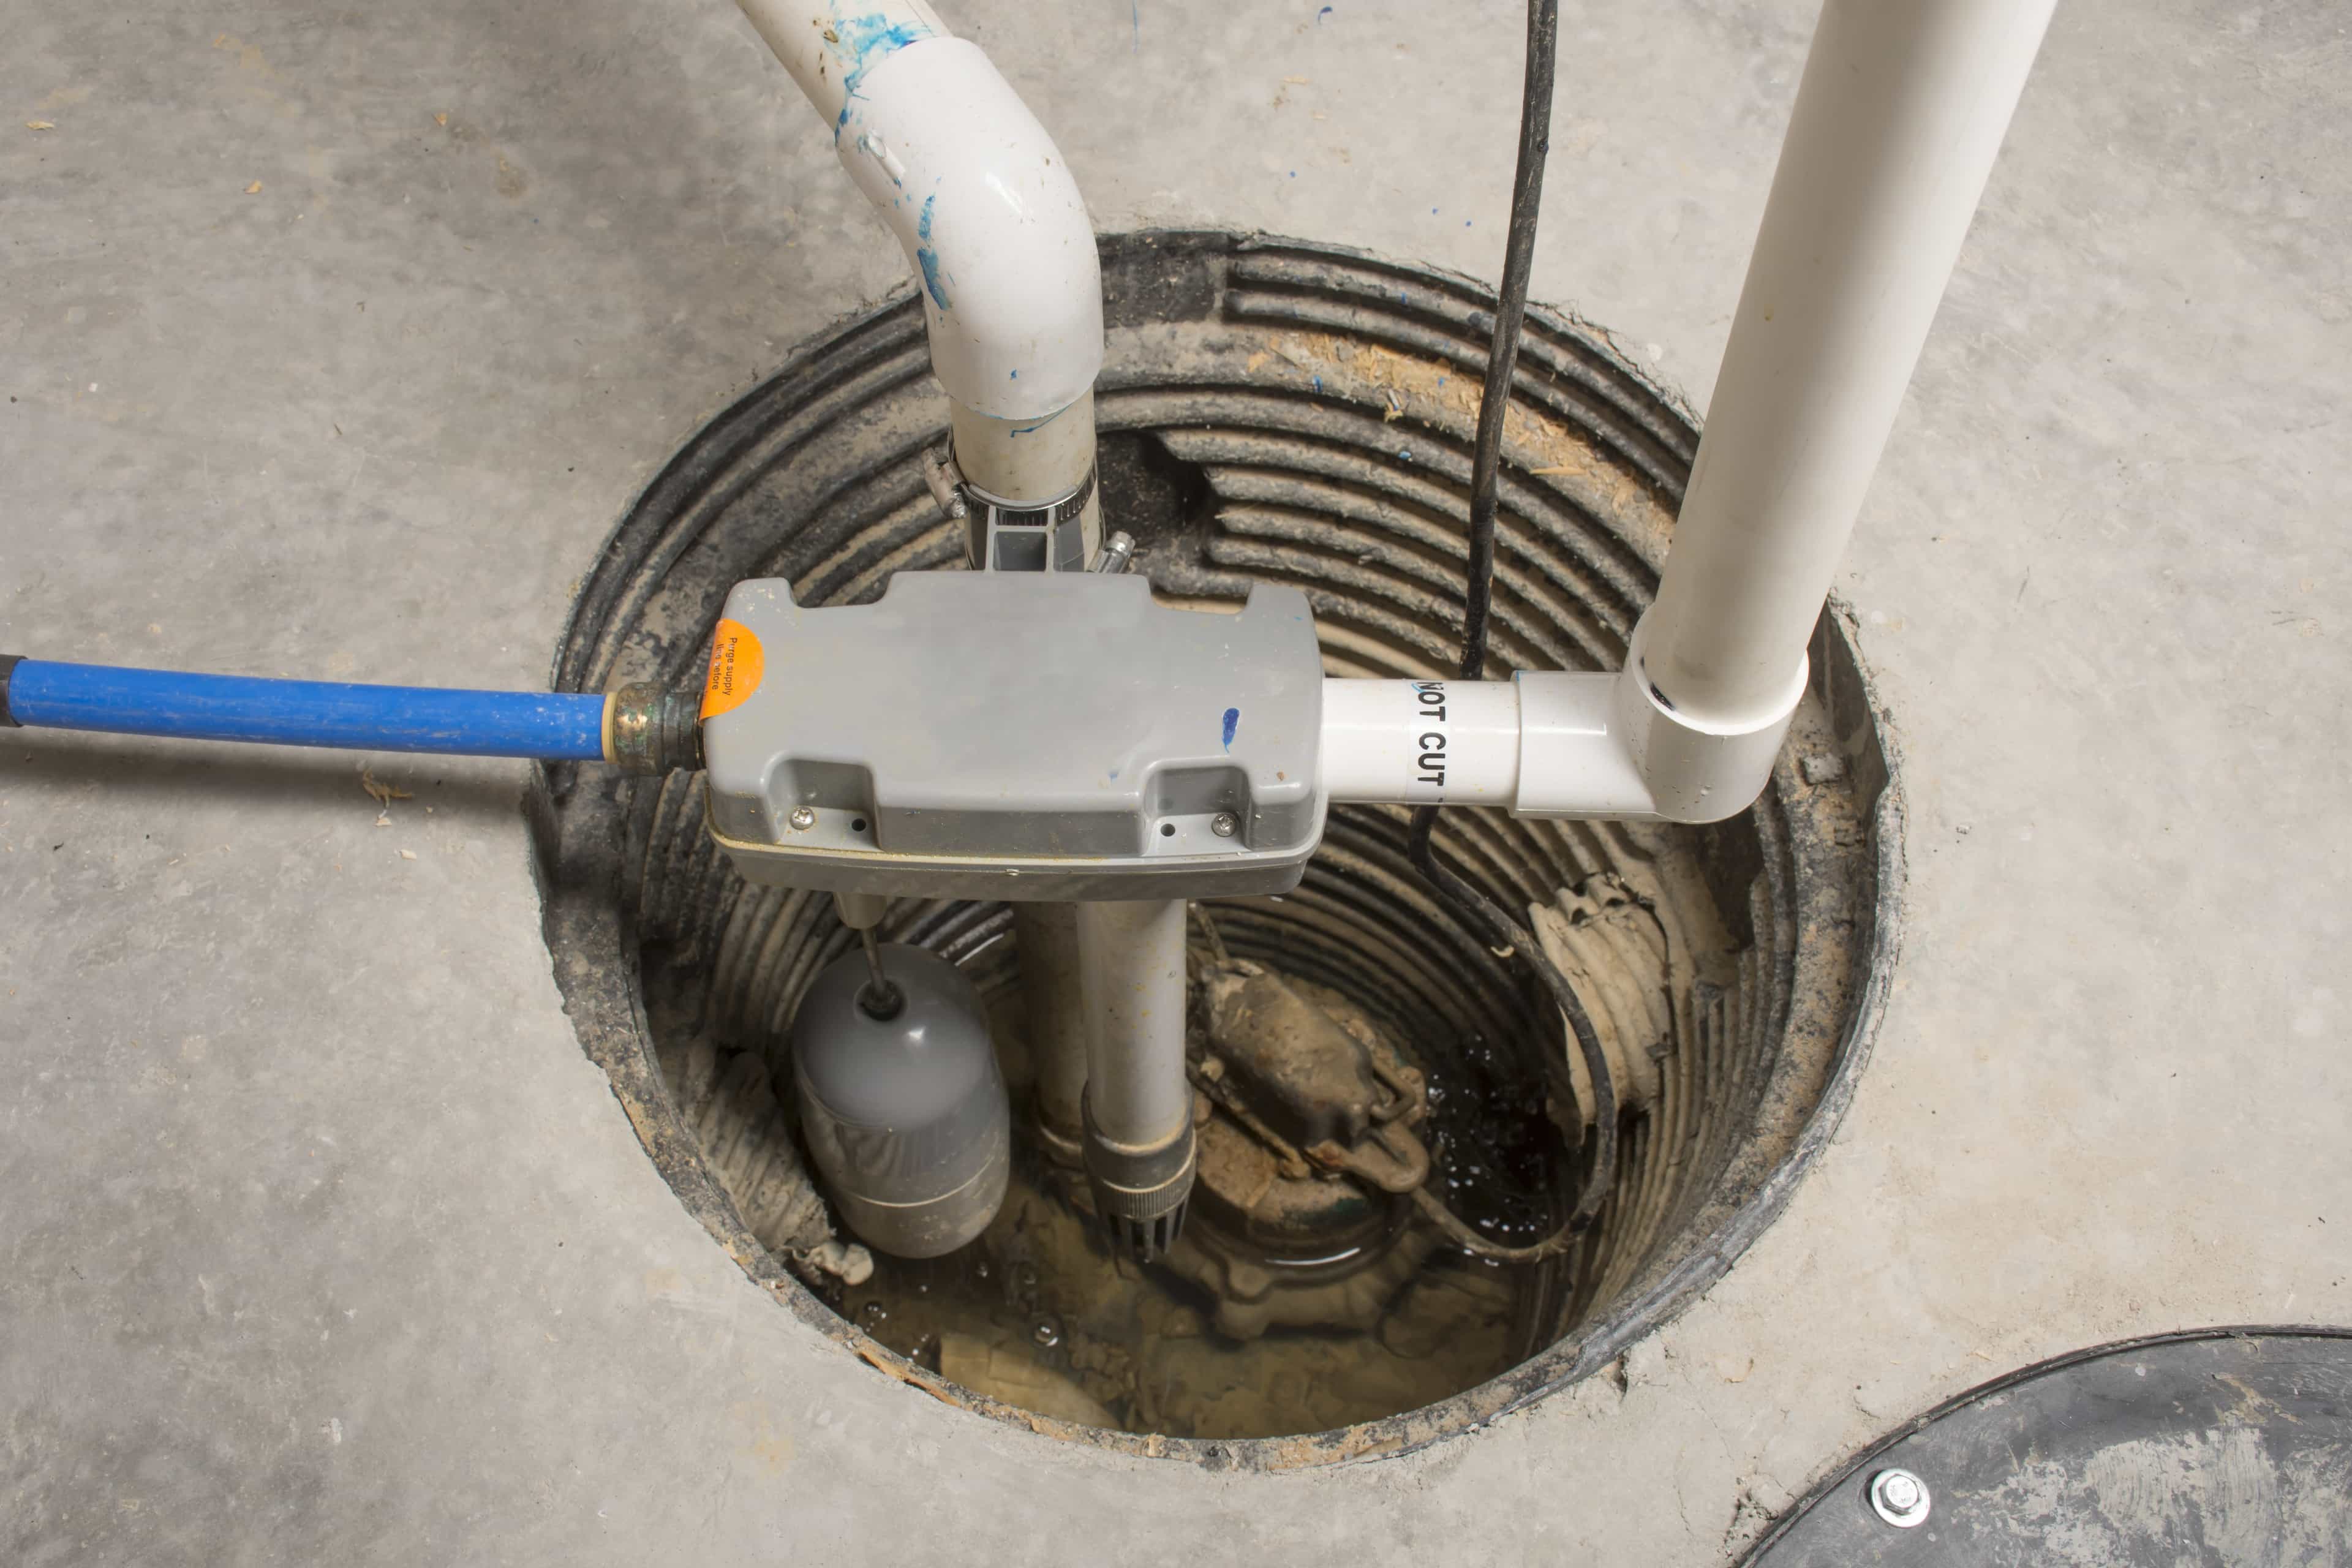
Interior Systems: Managing Water After It Gets In
Interior waterproofing is often misunderstood. In many Canadian contexts, “interior waterproofing” means creating a controlled collection path inside the basement perimeter—typically by cutting a trench along the inside edge of the slab, installing perforated drain pipe in gravel, connecting it to a sump pit and pump, and sometimes adding wall membranes to direct wall moisture down to the drain, as explained in Revival Construction’s overview of how basement waterproofing works which is a clear description of what the work actually looks like.
This is why interior systems are often described as water management rather than pure water blocking. They collect water that has entered and move it to a controlled exit.
Interior systems are also commonly positioned as less expensive and less disruptive than exterior excavation and can often be installed year-round, with the important caveat that they don’t relieve hydrostatic pressure on the exterior wall and rely on mechanical components like sump pumps, as discussed in Summit Drain’s comparison of interior vs exterior basement waterproofing which is exactly the trade-off you should understand before you choose.
Interior perimeter drains tend to be a strong fit when:
The basement is finished and you want to avoid exterior excavation
Exterior access is limited (tight lots, decks, porches, neighbour proximity)
The primary symptom is water at the wall–floor joint after storms
You need a scalable system that can manage intermittent high-load events
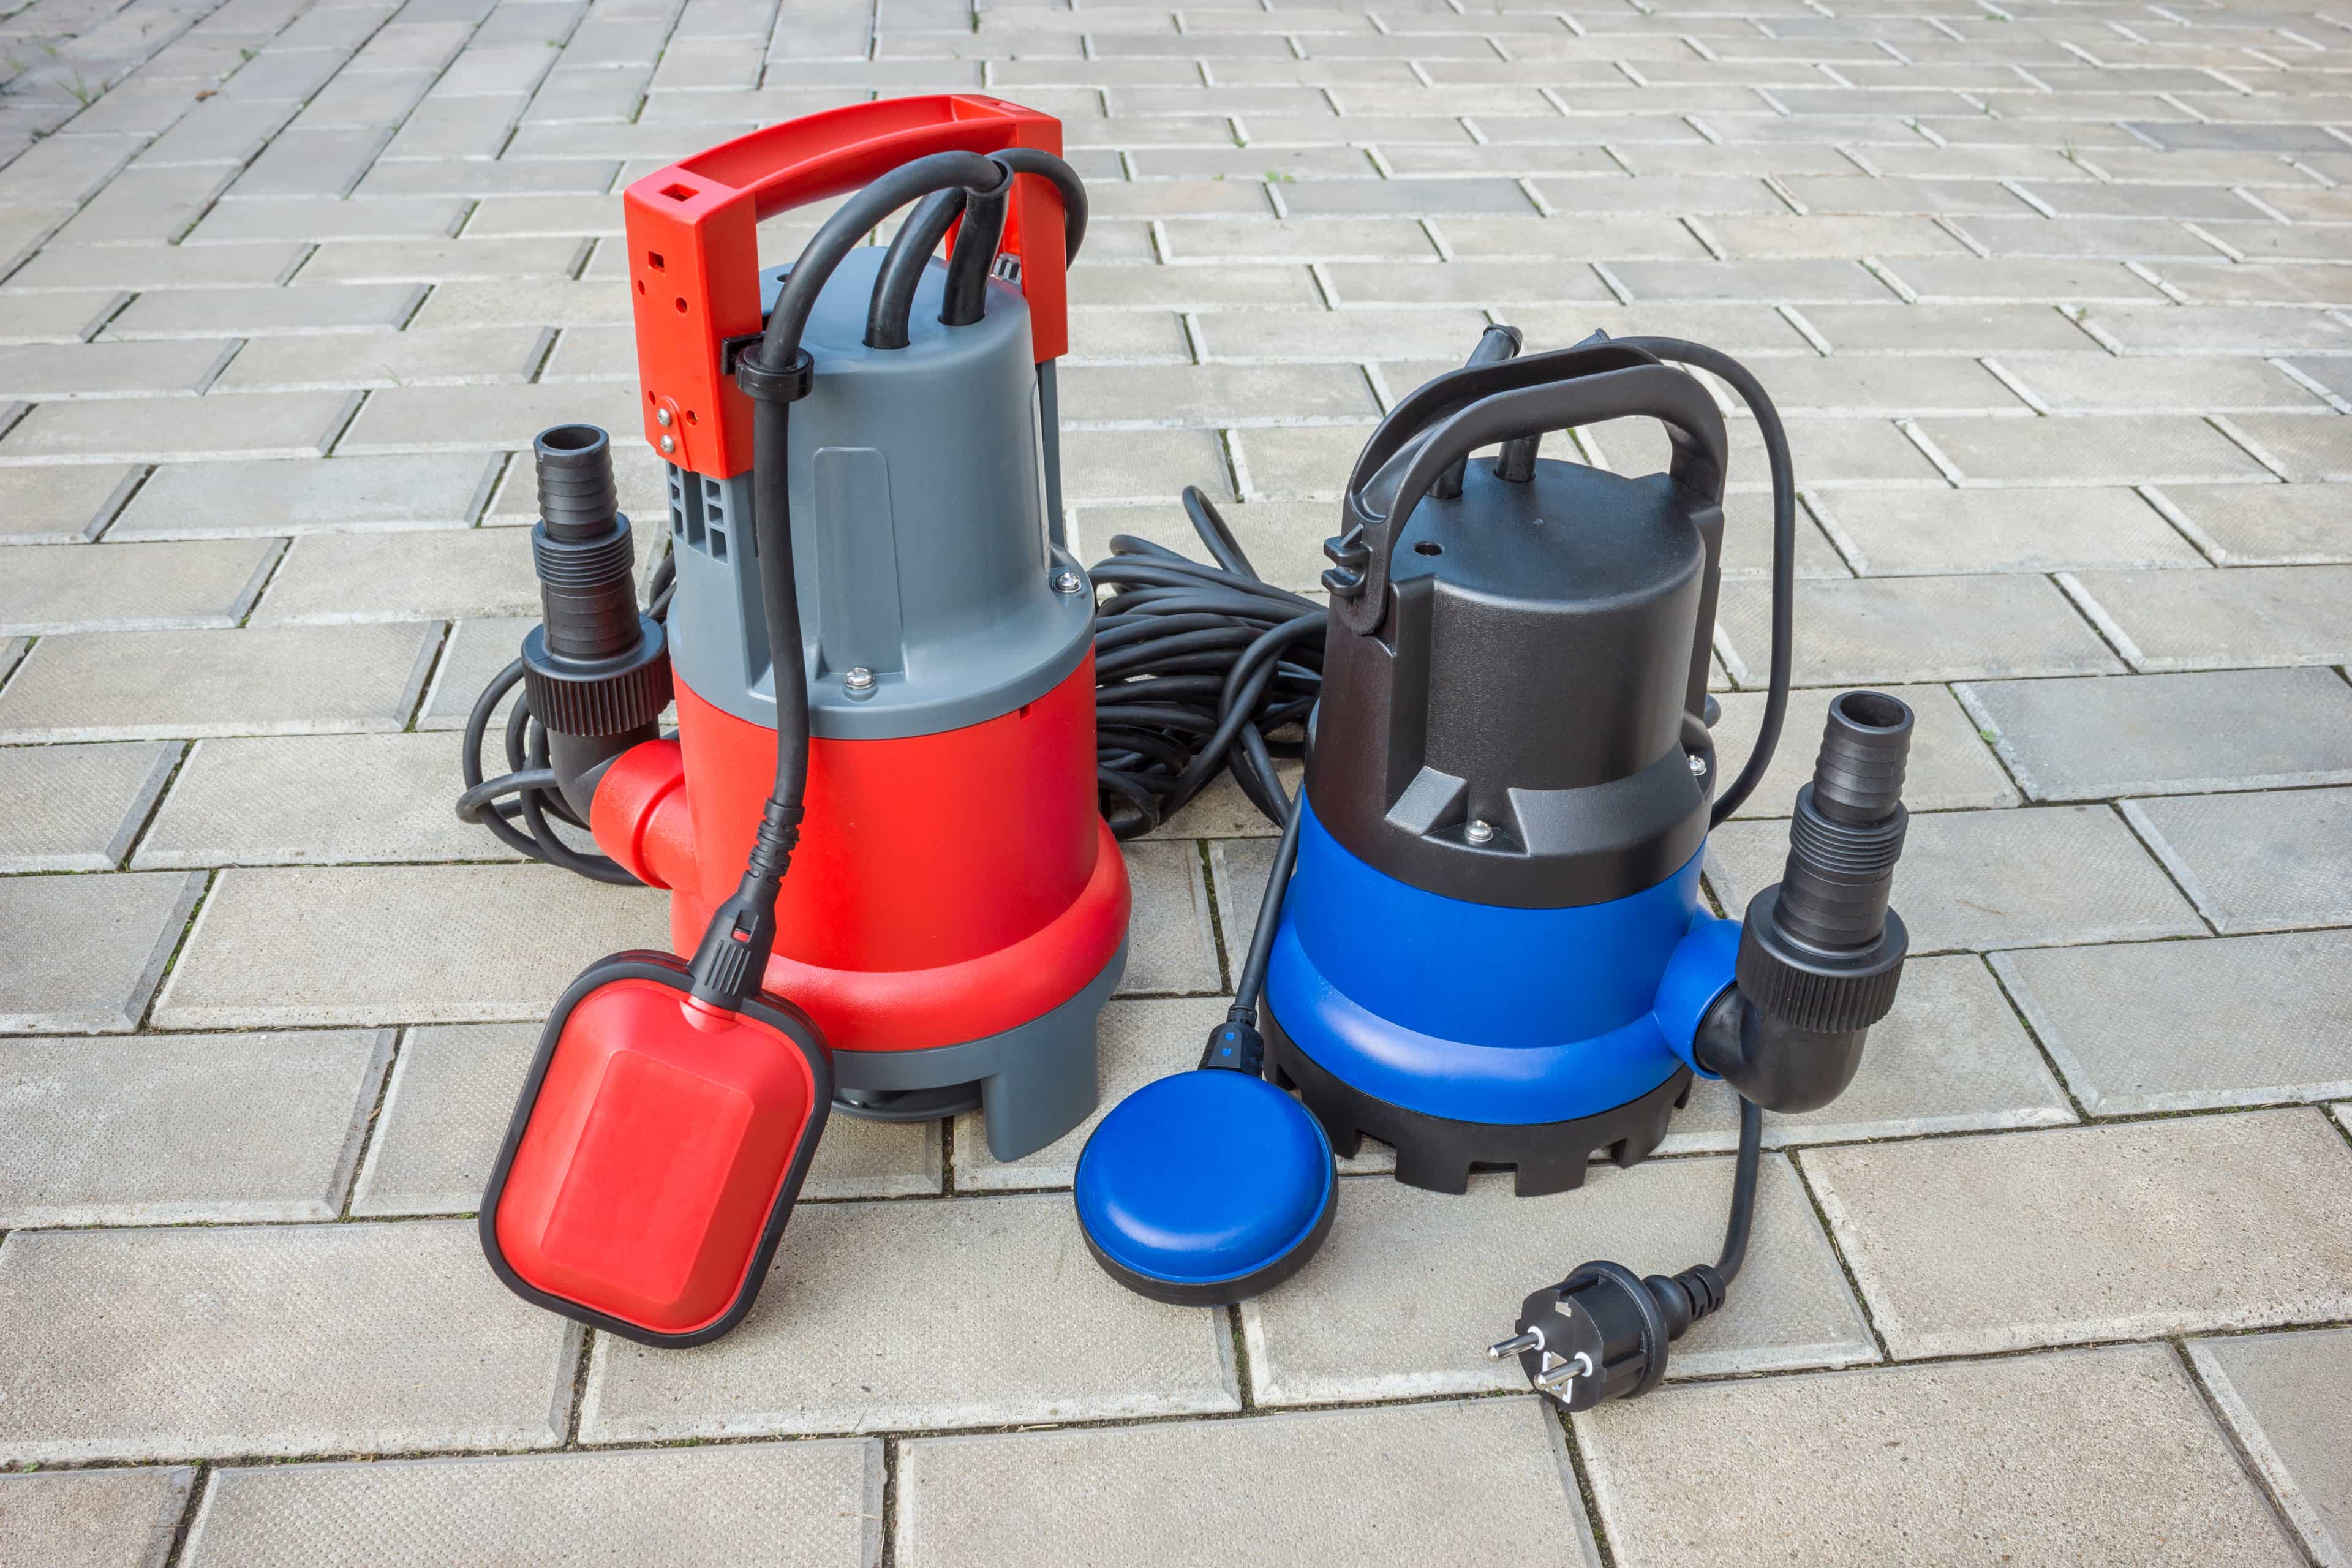
But they require ongoing responsibility: sump performance, discharge routing, and sometimes backup power planning.
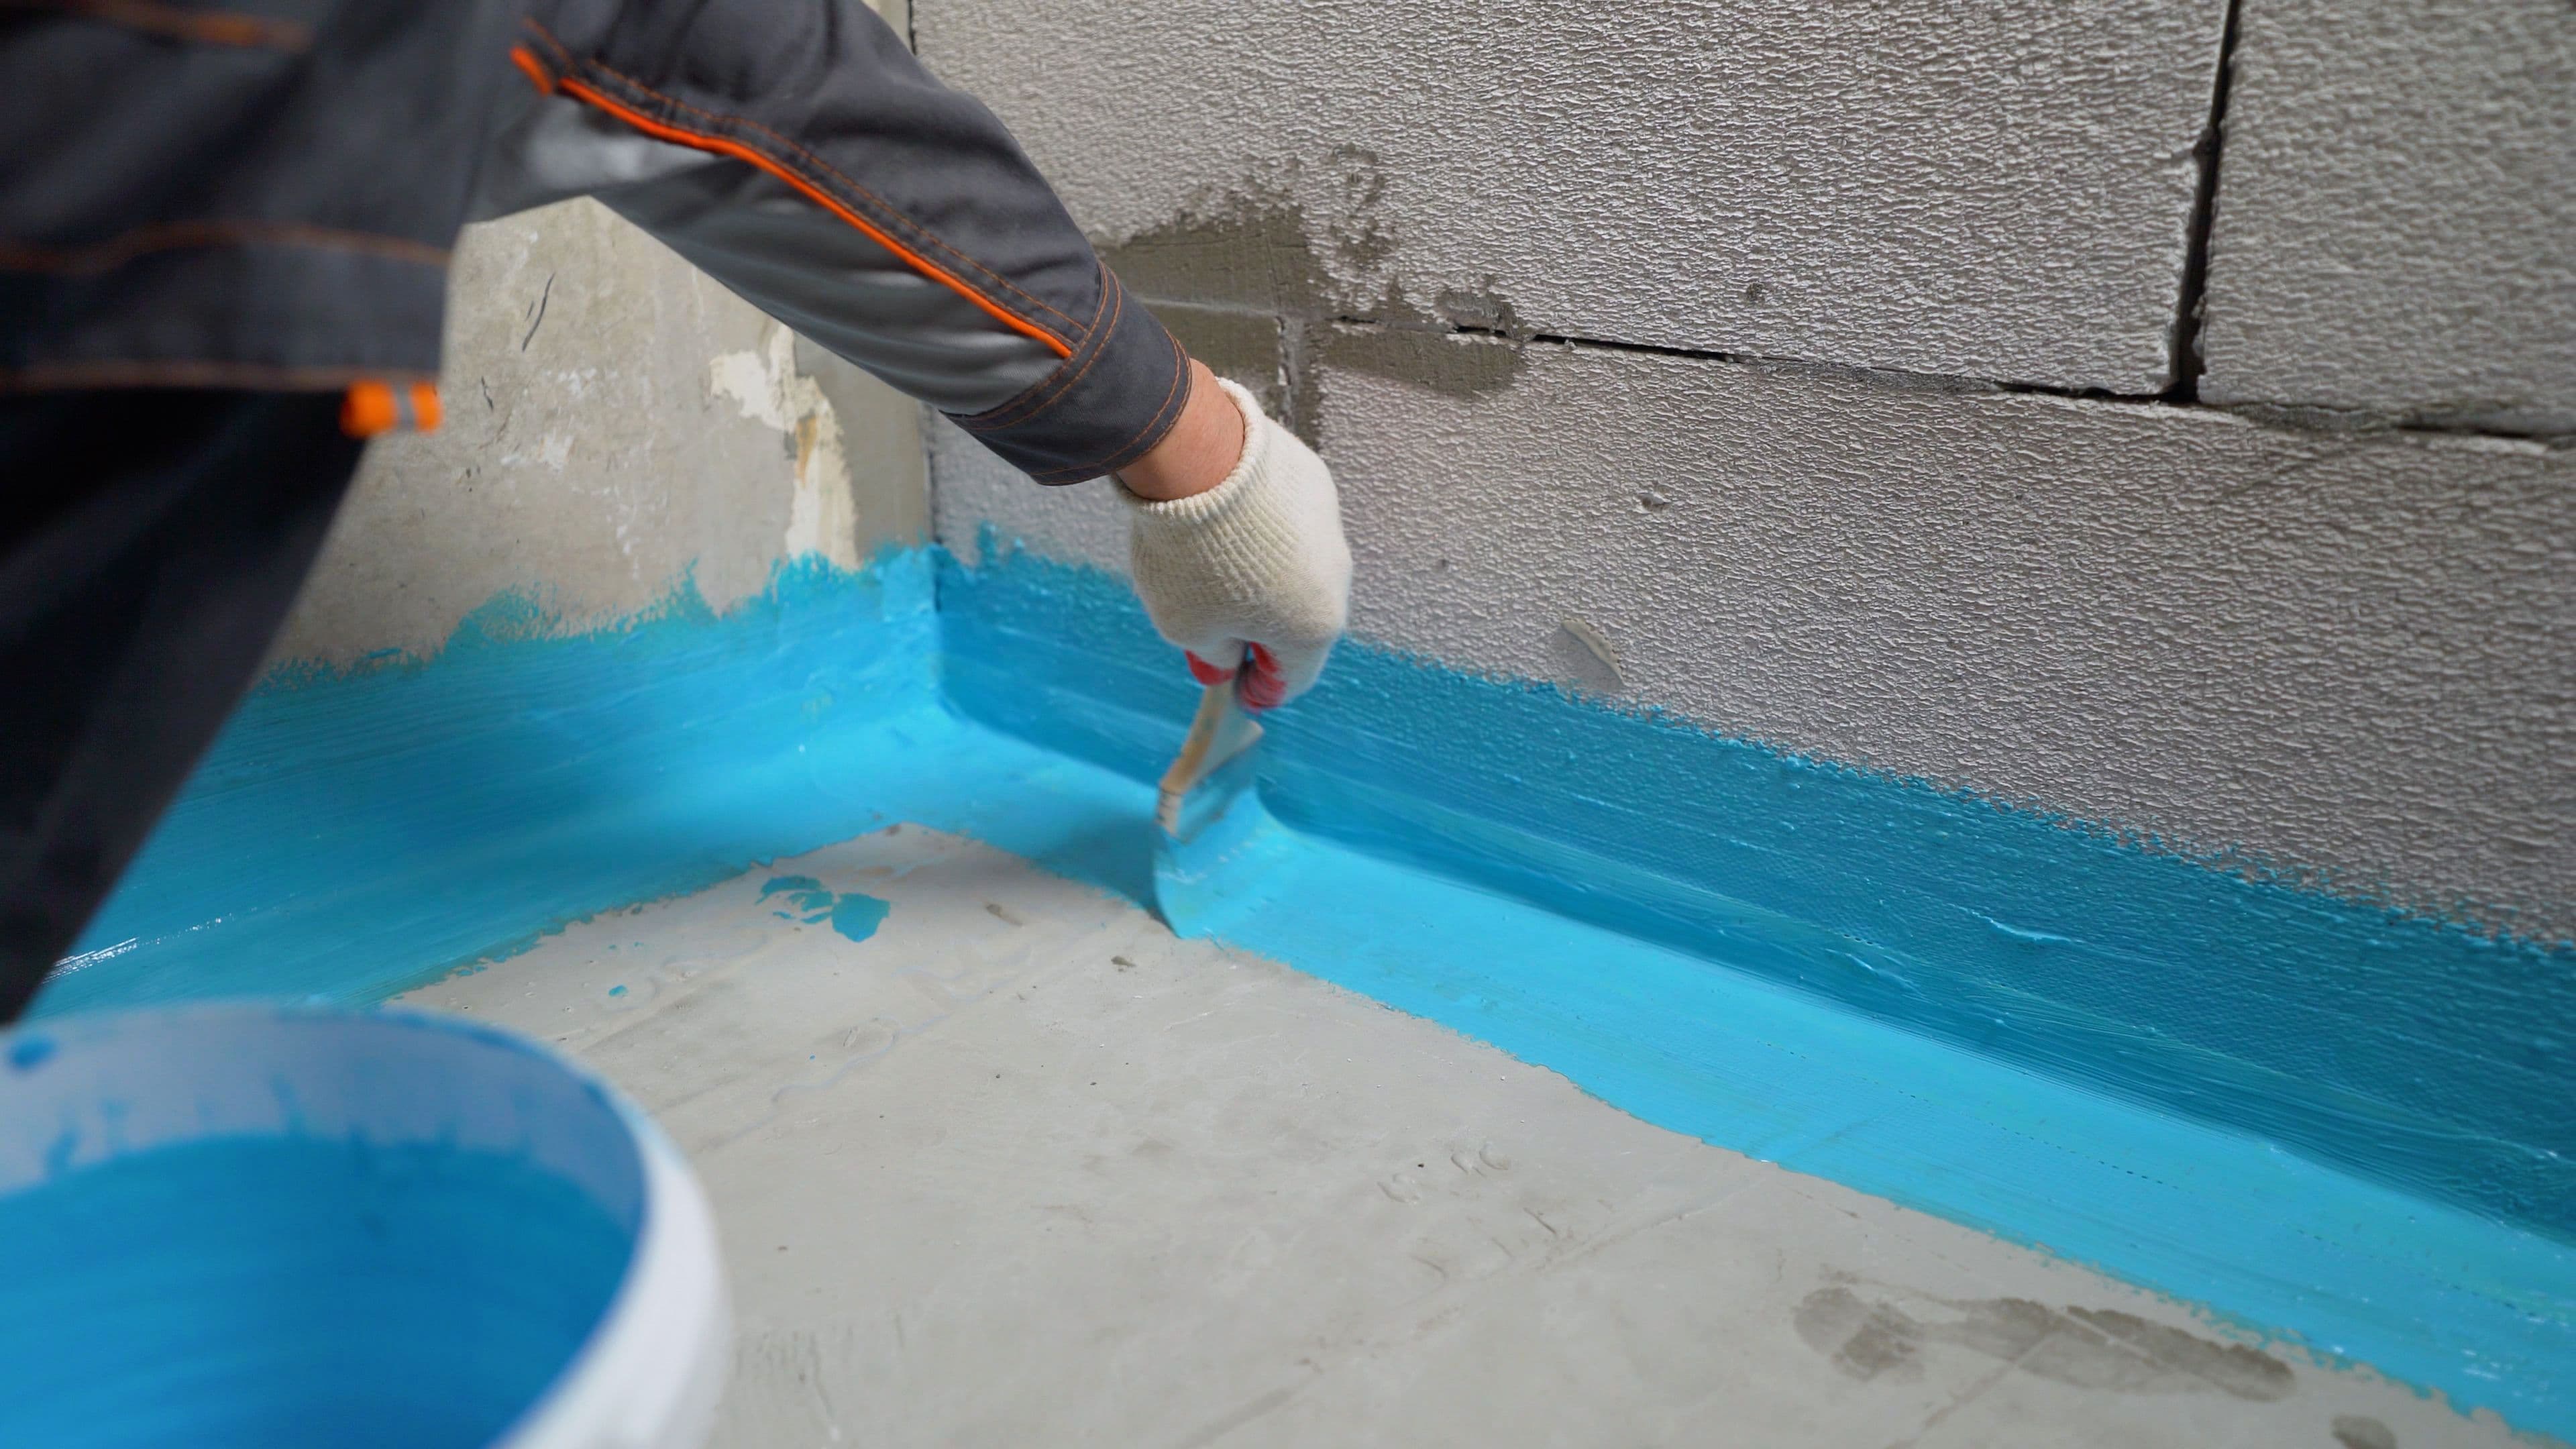
Exterior Waterproofing: Excavation, Wall Protection, and Footing-Level Drainage
Exterior waterproofing is the most direct way to stop water before it enters: excavate down to the footing, clean and repair the wall, apply a waterproof membrane (often with drainage board), install or replace weeping tile at the footing, and backfill appropriately so water is directed to the drain, as laid out in DryShield’s description of external waterproofing services which captures the typical scope.
Because it addresses the wall from the outside, exterior systems are often marketed as a longer-service-life solution when properly installed. Contractors commonly describe exterior waterproofing as lasting decades—often in the 30–50 year range—while noting that interior systems depend on shorter-life mechanical components like sump pumps, as referenced in Aquaboss Waterproofing’s Toronto cost discussion which is the right way to think about “lifespan” as a mix of materials, installation quality, and maintenance.
Exterior approaches tend to be a strong fit when:
You have repeated seepage through foundation walls (not just at the joint)
You can access the exterior walls without extreme demolition
You want to reduce hydrostatic pressure against the wall (not only collect water inside)
You’re already doing major exterior work (landscaping, drainage, rebuilding window wells)
They can also be the right call for severe groundwater issues—but they often cost more because excavation is labour-intensive and site-specific.
Weeping Tile Systems: The Quiet Workhorse Behind Both Approaches
In Canadian terms, “weeping tile” is essentially the perimeter drain system at the footing. Modern versions commonly use perforated plastic pipe, often with a filter “sock,” surrounded by gravel to intercept rising groundwater and direct it to a sump or storm outlet, as described in ACCL Waterproofing’s explanation of weeping tile systems which is a good mental model for why so many quotes focus on drains rather than coatings.
Many homeowner flood-risk resources emphasize that water management is ultimately about controlling where water goes around your home, including foundation drainage and site-level measures, as summarised in the Institute for Catastrophic Loss Reduction overview of flooding and risk reduction which aligns with the idea that drains, grading, and discharge routing all work together.
A simple comparison can keep expectations realistic:
If a quote leans heavily on “paint-on” coatings as the primary solution, ask one direct question: “How does this reduce hydrostatic pressure and manage water at the footing?” If the answer is vague, you may be looking at a cosmetic treatment rather than a drainage strategy.
Advertisement — Article Continues Below
Costs And Budget Planning In Canada
How Waterproofing Is Usually Priced
Most Canadian waterproofing pricing shows up in one of two forms:
Per linear foot pricing for a defined scope (interior perimeter drain, exterior excavation along specific walls)
Lump-sum project pricing based on the contractor’s measurement, assumptions, and risk buffer
Per-linear-foot ranges are common because they scale with how much wall is treated. In the Greater Toronto Area (GTA), cost calculators often cite interior waterproofing ranges roughly in the CAD $70–$200 per linear foot range and exterior waterproofing roughly in the CAD $150–$300+ per linear foot range, as shown in DryShield’s basement waterproofing cost calculator which also reinforces that depth, access, and scope details are what move you up or down within those bands.
On the West Coast, cost guides show similar per-foot logic with regional variations. In Metro Vancouver and across British Columbia, guides have reported interior perimeter approaches roughly around CAD $70–$230 per linear foot and exterior excavation/membrane/drain-tile approaches roughly around CAD $100–$320 per linear foot, with common total budgets varying widely depending on site complexity, as outlined in VR Restoration’s basement waterproofing cost guide for Vancouver which is useful for understanding how rainy climates and access constraints affect pricing.
Turning Per-Foot Quotes Into Realistic Budget Ranges
If you want a fast “sanity check,” measure your basement perimeter (or the affected walls) and translate per-foot into a range—then add likely add-ons.
Ontario-focused budget guides often translate typical interior system totals into the low-thousands to around the CAD $10,000 range and exterior projects into five figures that can exceed CAD $30,000 depending on depth and complexity, as reflected in McDowell Drain’s waterproofing cost calculator and pricing guide which is a helpful reminder that “per foot” is only the starting point.
You’ll also see total-project ranges presented by other Ontario providers, especially when bundling systems and common add-ons, as shown in the Basement Waterproofing Corp cost guide which reinforces that basements with deeper foundations, harder access, or extensive restoration needs can move sharply upward in price.
Common Add-Ons and Line Items You’ll See on Quotes
Even if you’re buying a perimeter system, most real basements need a few “supporting” line items. For example, crack repairs are often quoted as their own scope and sump systems can vary widely based on pump quality, backup options, and site conditions; cost guides commonly cite crack repair ranges in the hundreds to low-thousands per crack and sump installations in the low-thousands for complete systems, as shown in the City Wide Group cost guide for basement waterproofing in Toronto and the GTA which helps you recognize when an add-on is within a normal band versus unusually inflated.
Rebates and Subsidies That Can Reduce Your Net Cost
Before you accept a quote at face value, check whether your municipality subsidizes flood protection devices. Toronto, for example, offers a basement flooding protection subsidy program with a total cap per property and sub-caps for measures like backwater valves and sump pump installations, as described in the City of Toronto basement flooding protection subsidy program details which can materially change your out-of-pocket cost if you’re already planning the work.
Note
When you compare quotes, ask for a line-item version even if the contractor prefers a lump sum. The goal isn’t to “nickel and dime” the scope—it’s to make sure you understand what is included (and what isn’t), especially around restoration, discharge routing, and contingencies.
A basement is a below-grade structure, and below-grade structures behave differently than above-grade walls. Persistent seepage at the wall–floor joint, efflorescence, and storm-linked dampness often indicate groundwater and hydrostatic pressure dynamics where drainage strategies matter more than interior coatings, as explained in Building Science Corporation’s BSD-103 on understanding basements which is why the best fixes usually reduce water load and provide a controlled drainage path.
Here’s a decision framework you can actually use:
Is the moisture storm-linked or weather-independent?
Storm-linked points you to surface water + groundwater mechanisms
Weather-independent points you to plumbing leaks or condensation
Is the problem happening behind finished walls?
Finished basements often hide cold surfaces and air leaks that drive condensation cycles, and moisture management guidance for finished basements emphasizes controlling humidity and preventing trapped moisture, as discussed in the Berlin Homes guidance on avoiding moisture in finished basements which is especially relevant when you can’t “see” the concrete anymore
Is water entering at one location or many?
One location suggests a targeted path (crack, penetration, window)
Many locations suggest a system-level load/capacity issue (drainage, weeping tile, sump)
Are you trying to stop water outside, or manage it inside?
Exterior work aims to stop/re-route before entry
Interior systems aim to collect and control after entry
Symptom-to-Solution Map
Use this table to connect observations to the most likely “category” of fix:
Symptom Pattern
Likely Mechanism
Most Likely Best-Fit Fix Type
Water only during major storms, pooling near foundation
Surface water overload
Downspouts + grading + site drainage improvements
Damp walls + efflorescence + storm-linked seepage
Groundwater + hydrostatic pressure
Perimeter drainage (interior or exterior) + surface water control
Wet strip along wall–floor joint
Joint seepage
Interior perimeter drain and sump or exterior drainage improvements
Random wetness in summer, musty smell, no storm link
Condensation
Air sealing + dehumidification + insulation strategy review
Planning a Future Finished Basement Without Re-Creating Moisture Problems
Even after you fix water entry, you can accidentally rebuild a moisture problem by trapping vapour. Guidance on basement insulation assemblies warns against interior polyethylene vapour barriers over certain insulated foundation wall assemblies because they can trap moisture and increase mould/rot risk, as explained in the Building America Solution Center guidance on avoiding interior-side vapour retarders which is a key point if you plan to re-finish after waterproofing.
Warning
If your plan is “waterproof, then immediately finish,” treat the wall assembly as part of the waterproofing decision. A drainage fix can be undermined by a finishing system that prevents drying, especially in climates with big seasonal swings.
Advertisement — Article Continues Below
Hiring A Basement Waterproofing Contractor In Canada
The Pre-Hire Checklist That Prevents Most Regrets
Waterproofing can involve invasive work (slab cutting, excavation, drainage ties, restoration), so contractor selection matters as much as method selection.
Canada’s Office of Consumer Affairs recommends practical steps like meeting at least three contractors, getting written quotes, verifying insurance and workers’ compensation coverage, and checking references and complaint history before you sign, as outlined in the Government of Canada Office of Consumer Affairs guidance on home renovations which is a strong baseline for any major home project.
A waterproofing-specific version of that checklist:
Written scope that clearly states what problem is being solved (mechanism)
Proof of liability insurance and workers’ compensation coverage
A plan for unexpected conditions (hidden damage, deeper footing, access constraints)
Contracts and Payments: Practical Rules That Protect You
In Ontario, consumer protection guidance for home renovations emphasizes that contracts over a low dollar threshold must be in writing and should include contractor identity, detailed scope, warranties, and an itemized estimate that becomes part of the contract, and it also advises keeping deposits to a minimum and not paying the full price before completion, as explained in the Government of Ontario guidance on your rights for home renovations and repairs which is relevant even if you’re elsewhere in Canada because the principles are broadly protective.
A payment structure that reduces risk (and is common in reputable projects):
Small deposit to schedule the work
Progress payment tied to clear milestones (not calendar dates)
Holdback/final payment after completion and walk-through
Insurance, Permits, and “Who Owns What” in Writing
For invasive work, your contract should clearly assign responsibility for permits (if required), inspections, and code compliance, and it should confirm insurance levels and workers’ compensation coverage. Contractor-focused consumer guidance often recommends verifying general liability insurance (commonly in the millions) and confirming how disputes, delays, and change orders are handled, as discussed in the Ottawa Construction Network guidance on protecting yourself financially when hiring a contractor which is especially relevant when excavation, drainage connections, or restoration scopes are involved.
A simple “compare quotes” table can make this concrete:
Quote Item
Contractor A
Contractor B
Contractor C
Diagnosed mechanism stated clearly
Scope includes surface water control
Interior drain / exterior excavation details
Sump pump model + backup plan
Restoration scope included
Warranty length + exclusions
Insurance + workers’ comp proof provided
Change-order policy in writing
Important
If a contractor can’t explain the mechanism in plain language (what water source, what path, what control), treat that as a red flag. The best contractors don’t just sell a system—they explain why that system fits your house.
About the Author
Ryan May
Senior Contributor / Founder
Ryan is the founder of Homeowner.ca and a proud Canadian homeowner based in Guelph, Ontario. Over his 25-year career in digital publishing, he has focused on transforming complex information into clear, practical guidance that helps people make confident, well-informed decisions.
Start by noticing timing and location. Condensation tends to worsen during humid seasons or when indoor humidity is high, often on colder surfaces. Seepage is more storm-linked and often appears at cracks, joints, or the wall–floor seam. If you’re unsure, do a simple taped-sheet test on the wall and see which side collects moisture.
Efflorescence is typically a sign that moisture is moving through masonry and leaving salts behind as it evaporates. It’s often associated with ongoing moisture migration rather than a one-time spill.
Usually, no. Interior perimeter drain systems are designed to collect water that has already entered and move it to a controlled exit (typically a sump). They reduce damage and manage water reliably, but they don’t “take pressure off” the outside of the wall.
Exterior systems are often the better choice when you have repeated seepage through foundation walls, when exterior access is reasonable, and when you want to block water before it reaches the structure. They also make sense when you’re already doing major exterior work.
Expect concrete cutting along the perimeter, noise and dust, and patching afterward. In a finished basement, you may also need to remove and replace some bottom-wall finishes to access the edge of the slab.
Excavation can disturb landscaping, walkways, decks, stairs, and anything else that blocks access to the foundation wall. It can also introduce schedule risk if access is complex or if soil conditions create safety constraints.
It’s a perforated drain pipe installed near the footing, surrounded by gravel, designed to intercept groundwater and route it away from the foundation to a sump or storm outlet.
Coatings can help with minor dampness, but they don’t solve hydrostatic pressure or water accumulation at the footing. If water is actively entering after storms, drainage and load management are usually the core of the fix.
The biggest drivers are usually how much wall length is treated, foundation depth, access constraints, soil type, whether drains/weeping tile need replacement, sump scope, and how much restoration is needed afterward.
Ask what is included in that rate: demolition, disposal, drain pipe and gravel specs, sump pit and pump, wall membrane, reconnection to discharge, and restoration. Also ask what conditions would trigger a change order.
If your flooding risk is highest during storms and outages are possible in your area, backup power can be the difference between a managed event and a flooded basement. It’s a risk decision based on how critical the basement is and how often you see power interruptions.
If you’re at risk of sewer backup (water coming up through drains or fixtures), a backwater protection strategy is worth discussing with a qualified professional. It’s especially relevant in areas with older infrastructure or where heavy storms overload systems.
In some municipalities, yes. Programs can cover parts of the cost of measures like sump pumps or backwater valves. Always check your local municipality for current eligibility rules and caps.
The quote should state the diagnosed mechanism, the full scope, materials and method, warranty details, what restoration is included, who is responsible for permits (if any), and how changes/unknown conditions are handled.
Three is a practical minimum for major scopes. The goal isn’t to pick the cheapest number—it’s to compare whether the contractors agree on the mechanism and whether their scopes actually match.
You can, but only if the water entry problem is genuinely solved and the finishing system is designed to manage moisture safely. Rushing to rebuild without addressing ventilation, drying potential, and appropriate wall assemblies can recreate mould and dampness behind finished walls.