A Practical, Canada-Specific Playbook For Testing, Choosing, And Living With A Radon System

Understanding radon mitigation systems is crucial for safeguarding your home and health from this invisible threat. (Source: PointForm AI)
Radon is a colourless, odourless radioactive gas that seeps into homes from the soil, and it is recognised as the leading cause of lung cancer for non‑smokers in Canada according to the Health Canada Guide for Radon Measurements in Residential Dwellings. When radon accumulates indoors, the risk increases with both the concentration and the length of time you are exposed, which is why long‑term testing is the starting point for any mitigation plan.
Canada has a clear national guideline: if the long‑term average radon level in the occupied areas of your home is above 200 Bq/m³, you are advised to take action to reduce it according to the same Health Canada measurement guide, and the recommendation is to bring levels as low as reasonably achievable below that threshold. That gives homeowners a concrete decision point: once you know your number, you can decide whether mitigation is necessary and how aggressive it should be.
The good news is that modern radon mitigation systems are both highly effective and surprisingly straightforward to install. Techniques such as active soil depressurization can reduce indoor radon levels by more than 80% in most homes, often for about the same cost as replacing a furnace or air conditioner according to the Health Canada Radon Reduction Guide for Canadians. That combination of strong risk reduction and familiar price tags is what makes mitigation such a practical option for Canadian homeowners.
This guide from Homeowner.ca focuses on how these systems actually work in Canadian houses and what you can expect if you decide to install one. We will look at the main system types, how they fit different home designs and climates, how much they typically cost, and how to choose and maintain a system with the help of a qualified professional. By the end, you should have a clear, step‑by‑step mental model of how to go from “I have my radon result” to “My home is safely mitigated.”
Once you have a long‑term radon test result, the question becomes: “What now?” The national radon guideline sets a clear action threshold, but many homeowners are unsure how to interpret numbers that are just below or well above that line.
Health Canada advises that you should “fix your home” if your long‑term radon level is higher than 200 Bq/m³ according to the Health Canada Radon Reduction Guide for Canadians, and that you should still consider mitigation at or below this level if it is possible to lower radon further. The emphasis is on long‑term averages in occupied areas, typically the lowest lived‑in level where people spend at least four hours a day.
You can think of your radon result as falling into one of three practical “bands” in a Canadian context:
These bands are not formal categories in regulation; they are a homeowner‑friendly way of translating the Canadian guideline into an action plan, based on the Health Canada measurement guidance that explains how to compare your result to the national standard.
If your result is above 200 Bq/m³, treat mitigation as a planned home project rather than an emergency—but do not ignore it. Add it to the same priority tier as replacing a failing roof or furnace and aim to complete mitigation in the next heating season.
Every radon mitigation system is trying to do one core job: stop radon‑laden soil gas from building up in the air you breathe. In most Canadian homes, that means controlling the air in the gravel or soil directly under the foundation and giving it a safe, low‑resistance path to the outdoors.
Health Canada identifies active soil depressurization—often called sub‑slab or sub‑membrane depressurization—as the most effective and reliable radon reduction method in existing homes with concrete slabs according to the Radon Reduction Guide for Canadians. The idea is simple: instead of radon sneaking in through cracks and joints, a small fan actively pulls air from under the slab or membrane and sends it outdoors before it can leak into the house.
In a typical basement or slab‑on‑grade home, the main system elements look like this, as described in the Health Canada page on reducing radon in homes:
Because the fan runs continuously, the air pressure under the slab stays slightly lower than the indoor air pressure. That pressure difference reverses the natural flow of soil gas, so it goes into the pipe instead of through foundation cracks.
Here’s a quick reference for the main components you will see if you walk around a finished system:
When you are reviewing quotes, ask each contractor to show you where the suction point, fan, and outdoor discharge will go. A quick sketch on a floor plan or photo of your home makes it much easier to compare options.
The “right” mitigation system depends heavily on how your house is built. Canadian guidance highlights three main strategies—active sub‑slab depressurization, active sub‑membrane depressurization, and increased mechanical ventilation with HRVs or ERVs—according to a radon remedial action summary from the Pembina Trails School Division. Each strategy is best suited to particular foundation types and radon reduction targets.
You can use this table as a high‑level map:
The Radon Reduction Guide for Canadians explains that when large radon reductions of 50% or more are needed, active soil depressurization systems are usually recommended, while smaller reductions may sometimes be achieved through increased ventilation or sealing entry routes according to the same Health Canada guidance. That is why, in practice, most Canadian homeowners with significantly elevated radon levels end up with sub‑slab or sub‑membrane systems as the backbone of their mitigation plan.
If your home has a basement or slab‑on‑grade foundation, there is a good chance your mitigation contractor will recommend an active sub‑slab depressurization (ASD) system. Health Canada describes this as the most effective and common method used by certified professionals in existing homes with concrete slabs according to the Radon Reduction Guide for Canadians.
In a classic ASD setup for a basement, the installer will:
Once the fan is running, it continuously draws soil gas into the suction pit and out through the pipe, flipping the pressure balance under your slab so radon takes the easier path into the vent instead of into your basement.
If you already have a sump pit, your contractor may propose tying the radon system into that pit rather than drilling a new suction hole. In this configuration, the sump basin is sealed with a gasketed lid, and the vent pipe draws air from the sump itself. This can be particularly effective in homes where drain tile collects water around the foundation and delivers it to the sump, because the same network of perforated pipe also collects radon‑laden soil gas.
The Radon Reduction Guide for Canadians notes that careful sealing of sump lids and penetrations is important to prevent radon and humidity from escaping back into the basement, and that these sump‑based approaches are variations of the same ASD principle described by Health Canada. The result, for the homeowner, is usually a neater install with fewer holes in the concrete.
In cold Canadian climates, the exterior portion of the vent pipe and fan must be designed to handle freezing temperatures and potential frost build‑up at the discharge. Your contractor will typically angle or locate the pipe to avoid icing, and may route it through conditioned space when possible.
Homes with crawlspaces, especially those with exposed soil floors, need a slightly different approach. Instead of drawing air directly from under a concrete slab, the system has to capture radon from the exposed earth and prevent it from leaking into the crawlspace air.
Health Canada recommends active sub‑membrane depressurization for these homes, which involves covering the soil with a durable polyethylene or similar membrane, sealing it to the foundation walls, and drawing air from beneath that membrane with a fan‑connected pipe vented outdoors according to the Radon Reduction Guide for Canadians. A radon information page for schools summarises the same method and emphasises the importance of sealing the membrane around penetrations and edges according to the Pembina Trails School Division’s remedial action description.
In practice, a crawlspace system usually looks like this:
The performance of a crawlspace system depends heavily on how well the membrane is sealed. If there are gaps at the walls or around penetrations, radon‑laden air can leak into the crawlspace instead of going into the vent pipe, which is why Canadian guidance stresses meticulous sealing in sub‑membrane systems.
From the homeowner’s point of view, you end up with a cleaner, often drier crawlspace floor covered by a tough plastic liner, a vent pipe and fan similar to a basement system, and substantially lower radon levels in both the crawlspace and living areas.
Ventilation can also play a role in radon mitigation, especially when reductions needed are modest or when you want to improve overall indoor air quality at the same time. In Canadian buildings, this typically means using a heat recovery ventilator (HRV) or energy recovery ventilator (ERV) to bring in fresh outdoor air and exhaust stale indoor air while conserving heat.
A Canadian school division’s overview of mitigation options explains that increased mechanical ventilation with HRVs or ERVs is one of three common strategies for reducing radon, alongside sub‑slab and sub‑membrane depressurization, and it cautions that HRV/ERV systems must be balanced so they do not depressurise the building and draw in more radon according to the Pembina Trails School Division’s remedial action summary. The goal is to exchange air, not to create strong negative pressure.
In Canada, HRVs themselves are covered by minimum energy performance standards under the national energy efficiency regulations, meaning they are designed to recover heat efficiently while exchanging air according to the Natural Resources Canada page on energy efficiency regulations for heat recovery ventilators. This is why you see HRVs installed routinely in newer, tighter homes: they refresh indoor air without a big energy penalty.
For radon, HRVs can:
However, the Radon Reduction Guide for Canadians makes it clear that when large reductions—on the order of 50% or more—are needed, active soil depressurization is usually preferred, with ventilation and sealing playing supporting roles according to the Health Canada reduction guidance. In other words, HRVs are a useful tool, but they are rarely the main solution in homes with significantly elevated radon.
Do not try to “solve” a very high radon level by simply adding more exhaust fans. Unbalanced exhaust can depressurise your home and actually pull in more radon from the soil, which is exactly the risk highlighted in Canadian guidance on HRV/ERV balancing.
Understanding cost is often the make‑or‑break factor for homeowners considering mitigation. Fortunately, multiple Canadian sources paint a consistent picture of typical price ranges and operating costs.
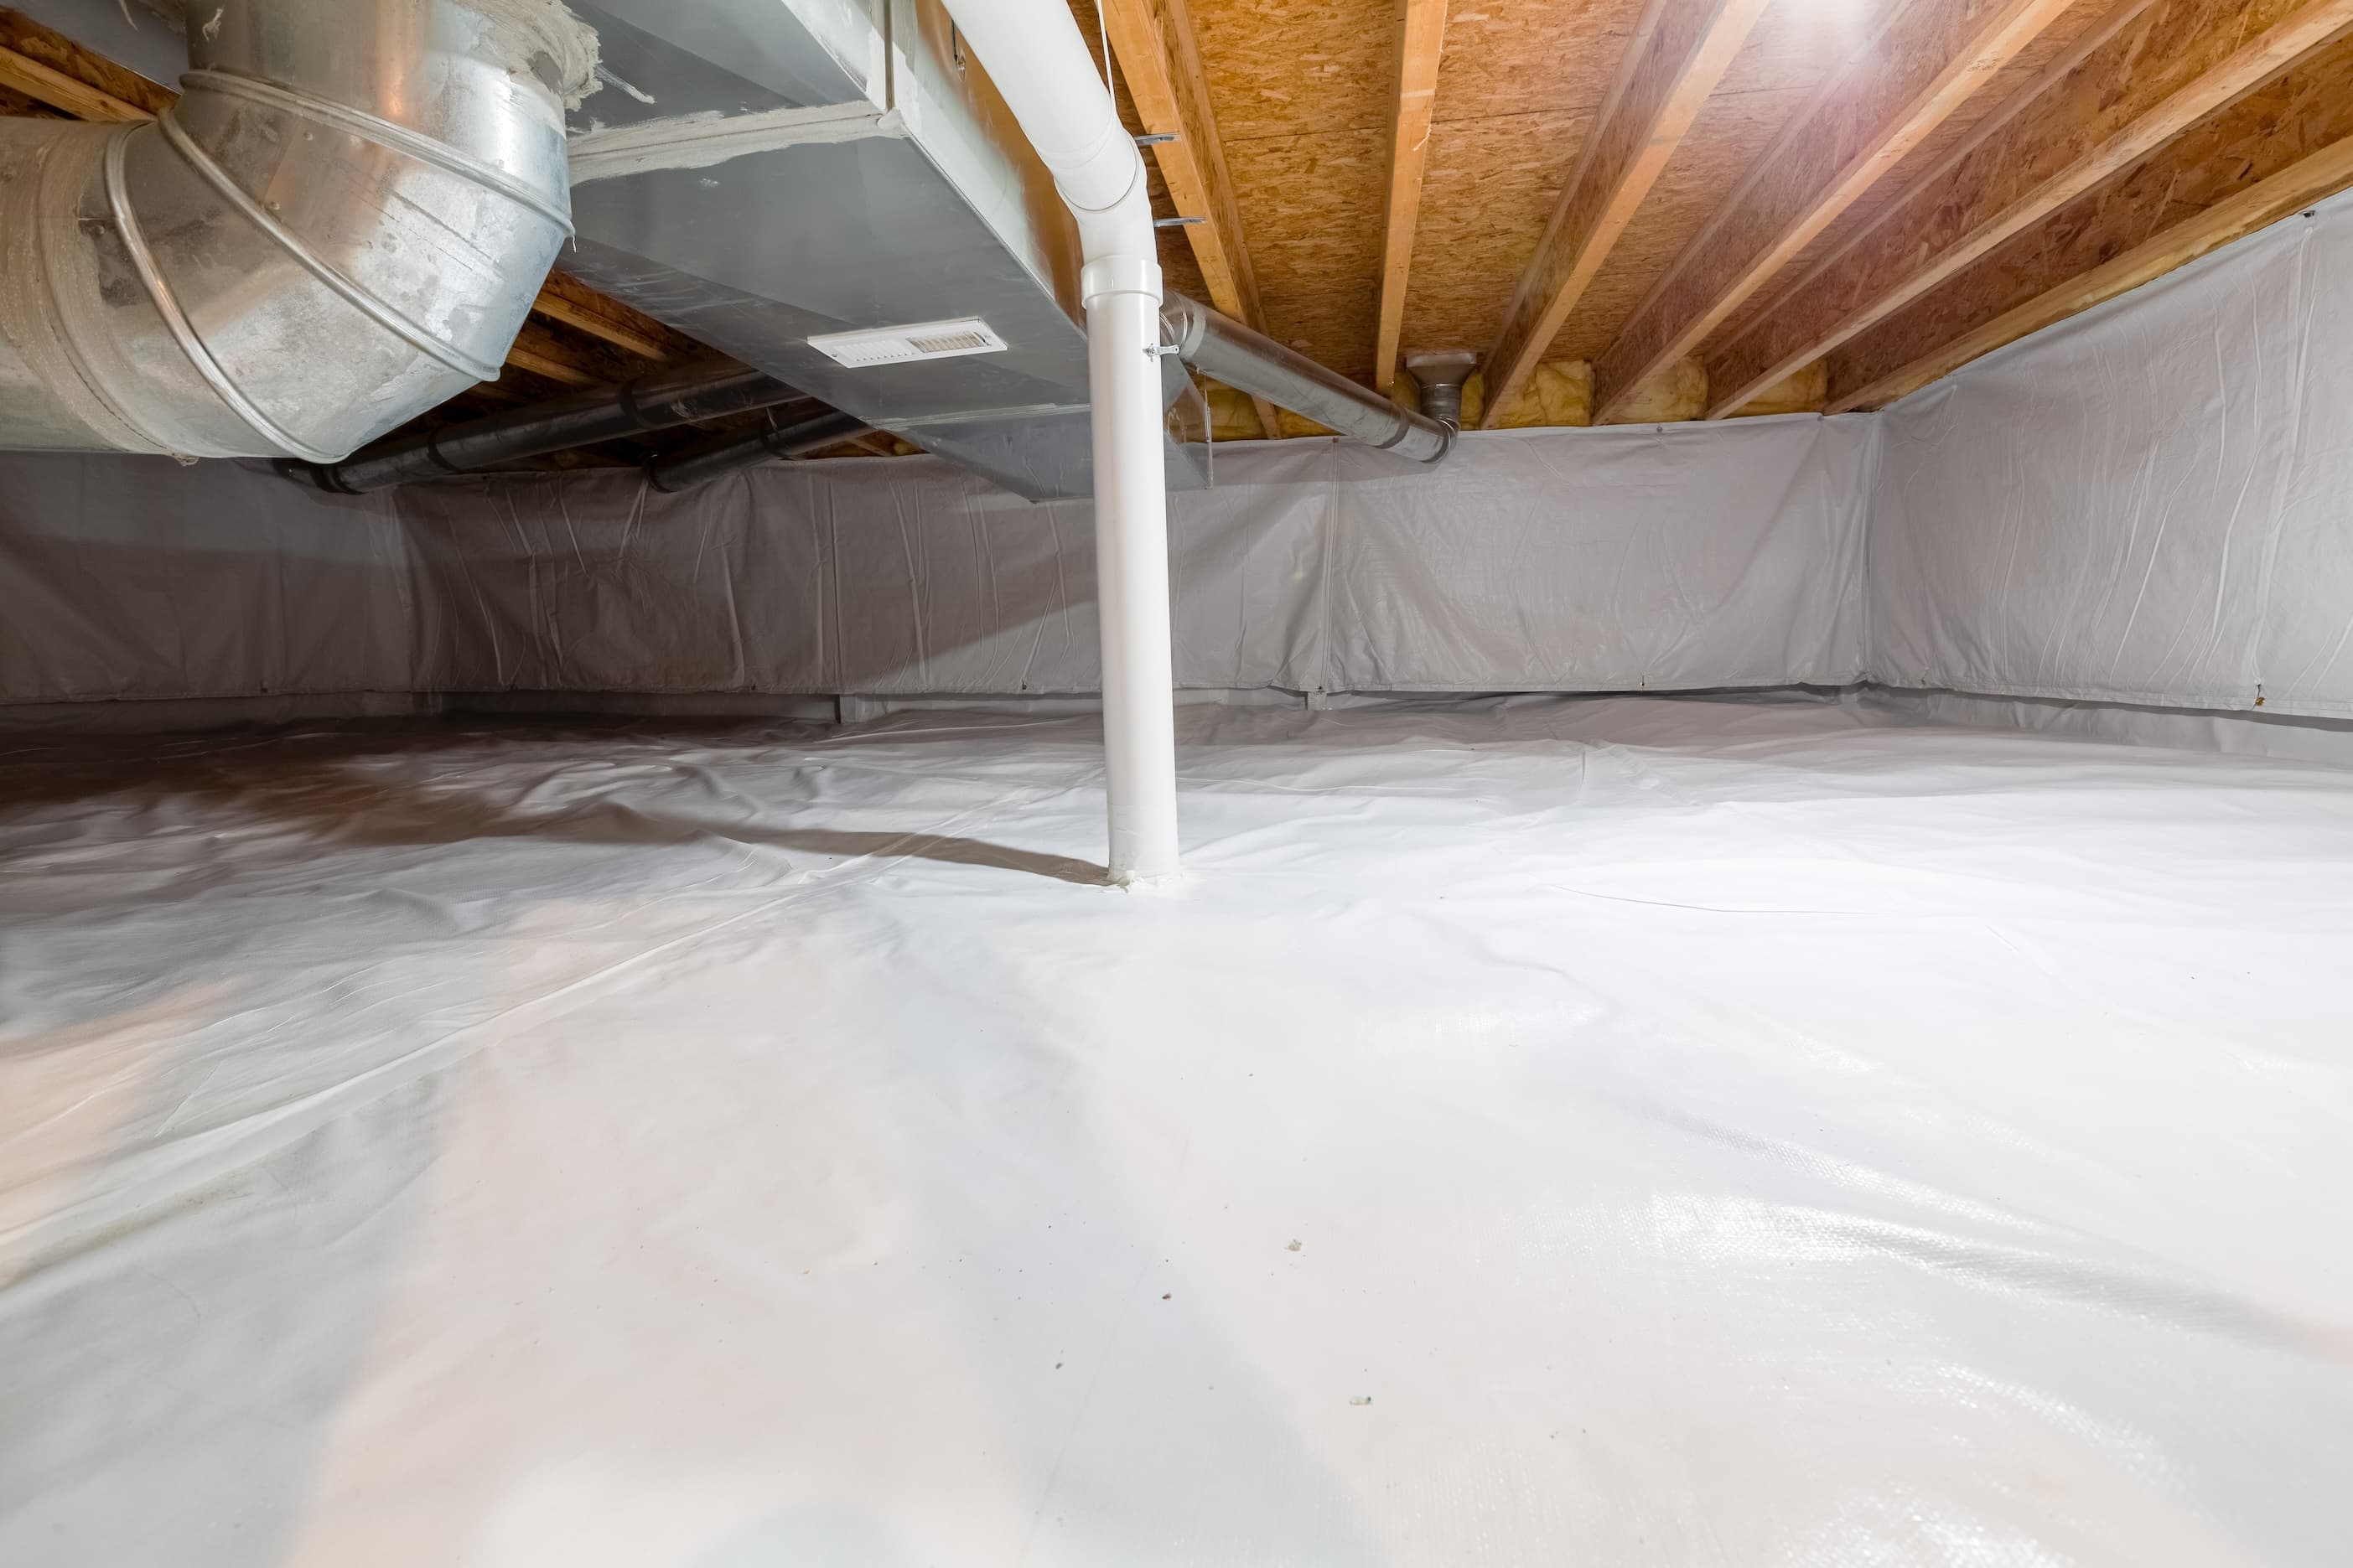
Health Canada notes that sub‑slab and sub‑membrane depressurization systems in most homes typically cost about $2,000 to $3,000 including materials and labour, with an additional annual electricity cost of roughly $50 to $75 to run the fan continuously, according to the Radon Reduction Guide for Canadians. A related policy rationale document reports that mitigation professionals commonly charge between about $2,500 and $3,000 to retrofit radon reduction systems in existing homes, and that adding radon‑ready features during new construction is significantly less expensive according to the Health Canada justification and policy rationales for the radon guideline.
Real‑world program data backs this up. A national campaign report summarising hundreds of systems installed across Canada between 2013 and 2021 found an average mitigation cost of about $2,700, with most systems falling between roughly $3,000 and $11,000 depending on the complexity of the installation according to the Take Action on Radon “Reducing Radon” information. That higher end of the range generally reflects larger homes, multiple suction points, challenging vent routing, or significant finish work.
Homeowner‑facing cost guides give similar numbers from the consumer side. A Canadian renovation price guide for radon mitigation systems reports that most homeowners spend a few thousand dollars for a complete system, with many projects landing in the $2,000–$5,000 range according to a HomeStars radon mitigation system cost guide. A contractor blog summarising radon testing and mitigation costs in Canada notes that basic long‑term tests are comparatively inexpensive while full mitigation systems usually cost several thousand dollars, reflecting home size and design, according to the Radon‑86 article on radon testing and mitigation costs.
Local markets show some variation within those national ranges. For example, a Calgary‑based contractor reports typical radon mitigation system prices in the mid $2,000s for straightforward jobs, with higher costs for complex layouts, challenging vent routes, or exterior aesthetic requirements according to a Calgary Radon Detection blog on local mitigation costs. These local examples are helpful for setting expectations in specific cities, but the broad picture remains: most Canadian homeowners are looking at a project broadly comparable in price to a major appliance or mechanical replacement.
To see how these pieces fit, it can help to think in terms of scenarios:
Most homeowners also want to know how disruptive the install will be. A consumer FAQ from a Canadian mitigation contractor notes that most residential systems can be installed in a single day, with pre‑assessment and follow‑up testing scheduled around that work according to the RadonReduction.ca frequently asked questions. A national radon awareness campaign similarly states that a certified mitigation professional can generally install a mitigation system in one day, underscoring that this is usually a short, focused project according to the Take Action on Radon guidance on reducing radon.
When you request quotes, ask contractors to break out: (1) system design and installation, (2) electrical work if needed, (3) any patching or cosmetic work, and (4) estimated operating cost per year. That makes it easier to compare apples‑to‑apples and align with the cost ranges described in Canadian guidance.
Once installed, a radon mitigation system becomes part of your home’s invisible safety infrastructure, much like a sump pump or smoke alarm. The fan runs continuously, quietly pulling soil gas from beneath your foundation and exhausting it outdoors.
Health Canada notes that in most homes, radon levels can be reduced by more than 80% with properly designed mitigation systems and that these systems are a practical, long‑term solution for existing dwellings according to the Radon Reduction Guide for Canadians. The same guidance explains that the modest additional electricity cost (often in the $50–$75 per year range) is part of the overall cost of owning this safety equipment.
Day‑to‑day, your responsibilities are limited:
The measurement guide for homes advises homeowners to re‑test after mitigation and to re‑test approximately every five years to ensure the system continues to work as intended according to the Health Canada Guide for Radon Measurements in Residential Dwellings. Re‑testing is also recommended after any major renovation, foundation repair, or HVAC upgrade that might change the pressure balance or airflows in your home.
Do not switch your radon fan off to “save energy,” even in summer. The system is designed to protect you year‑round, and turning the fan off can allow radon to rise quickly, especially during shoulder seasons when windows are closed but heating is off.
While some elements of a radon system look straightforward—PVC pipe, a fan, a vent—getting the details right requires specialised training and experience. Health Canada strongly recommends that homeowners hire a contractor certified under the Canadian National Radon Proficiency Program (C‑NRPP), noting that effective mitigation requires specific technical knowledge and skills according to the Radon Reduction Guide for Canadians.
A C‑NRPP‑certified mitigation professional will typically:
A national awareness campaign emphasises that not everyone is qualified to install mitigation systems and that consulting a certified professional is important to ensure your home is mitigated safely and effectively according to the Take Action on Radon “Reducing Radon” guidance. From a homeowner’s perspective, selecting a qualified installer is as important as choosing the right system type.
Homeowner.ca’s general advice is to treat mitigation quotes much like quotes for a furnace replacement or major electrical project: verify credentials, ask for references or reviews, and make sure you understand what is included and what post‑installation testing will confirm.
To pull everything together, it helps to have a simple decision framework you can walk through once you have your test result:
Confirm your measurement.
Make sure your long‑term test followed the basic placement and timing guidelines for Canadian homes as outlined in the Health Canada measurement guide. If in doubt, repeat the test or consult a C‑NRPP measurement professional.
Compare your result to the guideline.
If your long‑term average is above 200 Bq/m³, plan for mitigation; if it is near but below that level, weigh the cost and practicality of mitigation against your comfort with risk, using the same Canadian guideline as your reference point.
Identify your foundation type.
Basement slab, slab‑on‑grade, or crawlspace? This largely determines whether you are looking at sub‑slab depressurization, sub‑membrane depressurization, or a combination including ventilation, as described in Canadian mitigation summaries such as the Pembina Trails remedial action guidance.
Estimate a rough budget.
Use the $2,000–$3,000 range for straightforward systems, with higher allowances for large or complex homes, guided by cost ranges provided in the Radon Reduction Guide for Canadians and national averages summarised by Take Action on Radon.
Collect quotes from C‑NRPP‑certified contractors.
Ask each contractor about system type, expected reduction, cost breakdown, fan location, and post‑mitigation testing. Use local guides and contractor‑reported ranges, such as those from Calgary Radon Detection or homeowner cost guides from HomeStars, to sanity‑check quotes.
Install, test, and then re‑test periodically.
Once your system is installed and a follow‑up test confirms success, add radon re‑testing to your long‑term home maintenance plan, typically every five years or after major renovations, in line with the Health Canada guidance for radon measurements in homes.
Think of mitigation as a long‑life safety upgrade. The initial project is a one‑time effort, but the value comes from continuous operation and occasional verification that your system is still doing its job.
The Canadian guideline advises taking corrective action when the long‑term average in occupied areas exceeds 200 Bq/m³, and it recommends reducing levels as low as reasonably achievable below that threshold according to the Health Canada measurement guide for homes. If your result is only slightly above 200 Bq/m³, you might have more flexibility on timing or system design, but mitigation is still recommended.
In most Canadian homes, properly designed mitigation systems can reduce radon levels by more than 80%, turning very high readings into levels well below the guideline, according to the Health Canada Radon Reduction Guide for Canadians. Your contractor can often provide a target range based on similar homes they have mitigated.
Sealing visible entry points like cracks and gaps can help reduce radon but is rarely enough on its own when large reductions are needed; Canadian guidance notes that sealing is typically used as a supporting measure alongside active soil depressurization according to the Health Canada Radon Reduction Guide for Canadians. Sealing alone may be considered in low‑level situations where only small reductions are required, but it should be validated by follow‑up testing.
Heat recovery ventilators can help dilute radon and improve indoor air quality, but they are usually supplementary rather than the primary solution when radon levels are well above the guideline; a Canadian school division’s mitigation summary emphasises that HRV/ERV systems are one of several strategies and must be carefully balanced so they do not depressurise the building and pull in more radon according to the Pembina Trails remedial action information. For large reductions, active soil depressurization is generally preferred.
Many residential systems can be installed in a single day once the design is agreed, with site assessment and follow‑up testing scheduled around that work, as noted in the RadonReduction.ca frequently asked questions and echoed by national campaigns such as Take Action on Radon. Complex projects may take longer, particularly if multiple suction points or extensive finish work are involved.
Most radon fans are designed to operate quietly, similar to a small bathroom fan or the background hum of a fridge, especially when located in a mechanical room, attic, or outside; Canadian homeowner cost and system guides describe noise as a minor consideration that is usually manageable with thoughtful placement, as reflected in homeowner experiences summarised in a HomeStars radon mitigation system cost guide. Your installer can propose locations that minimise noise in living spaces.
After your system is installed and initial follow‑up testing confirms that radon has been reduced, Health Canada recommends re‑testing about every five years or after any major renovation, in order to ensure the system is still performing effectively according to the Guide for Radon Measurements in Residential Dwellings. Re‑testing is inexpensive compared with the value of confirming long‑term safety.
For crawlspaces, especially with exposed soil floors, Canadian guidance recommends covering the soil with a sealed polyethylene membrane and using active sub‑membrane depressurization to draw radon from beneath that membrane, rather than relying only on ventilation or sealing according to the Health Canada Radon Reduction Guide for Canadians and summaries like the Pembina Trails remedial action page. This approach usually delivers reductions comparable to basement systems.
While national guidance points to typical system costs around $2,000–$3,000, local labour and construction conditions can shift quotes up or down; city‑specific contractor examples, such as a Calgary‑based cost overview from Calgary Radon Detection, and homeowner‑reported ranges collected by HomeStars are useful for calibrating expectations in your market. The best way to get an accurate figure is still to request site‑specific quotes.
Yes; a Health Canada policy rationale document notes that the cost of radon mitigation is significantly lower when radon measures—such as piping and rough‑ins for active soil depressurization—are included during construction instead of retrofitted later, according to the Health Canada justification and policy rationales for the radon guideline. Adding a radon‑ready rough‑in at build time is often a small incremental cost that preserves flexibility if future testing finds elevated radon.
Focus on three things: the contractor’s credentials (C‑NRPP certification), the system design (suction points, fan placement, vent routing), and the performance target (expected post‑mitigation radon level), guided by the emphasis on certified professionals and effective system design in the Health Canada Radon Reduction Guide for Canadians. Cost matters, but a slightly higher quote for a better‑designed system can be better value over the long term.
Some handy homeowners may feel comfortable with parts of the work, but Health Canada and national campaigns emphasise the importance of using certified mitigation professionals because effective radon reduction requires specialised knowledge and can affect building pressure, combustion safety, and moisture management according to the Radon Reduction Guide for Canadians and homeowner‑oriented summaries like those from Take Action on Radon. DIY approaches should always be validated with proper long‑term testing.
Health Canada notes that the cost of reducing high radon levels is often comparable to other common home repairs such as replacing a furnace or air conditioner, highlighting that mitigation is both impactful and financially similar to work many homeowners eventually undertake anyway according to the Radon Reduction Guide for Canadians. This comparison can make budgeting easier when you are weighing radon mitigation against other planned projects.
The fan in a typical active soil depressurization system is relatively small and usually adds only around $50–$75 per year to your electricity bill in Canadian conditions, according to cost estimates in the Health Canada Radon Reduction Guide for Canadians. That operating cost is modest compared to the health protection the system provides.
Long‑term radon tests are generally inexpensive compared with mitigation and are the essential first step; a Canadian contractor overview of testing and mitigation costs explains that testing is a minor upfront expense while full mitigation systems usually fall into the few‑thousand‑dollar range according to the Radon‑86 article on radon testing and mitigation costs. Budgeting for both testing and, if needed, mitigation allows you to move from uncertainty to a clear plan.
Yes; many homeowners pair radon mitigation with ventilation or filtration upgrades that also address humidity, stale air, and other contaminants, and Canadian efficiency regulations for HRVs mean that modern units can exchange air while conserving heat according to the Natural Resources Canada energy efficiency regulations for heat recovery ventilators. Coordination between your radon contractor and HVAC professional can yield a more holistic indoor air quality strategy.
National initiatives such as Take Action on Radon collect real‑world data on mitigation costs and effectiveness, showing that average systems in Canada are both effective and broadly affordable, with typical costs around $2,700 and a wide range depending on complexity according to the Take Action on Radon “Reducing Radon” page. Local programs sometimes offer incentives, test kit distributions, or educational resources that can make it easier to move from testing to mitigation.
Health Canada. (2023). Radon – Reduction Guide for Canadians. Retrieved from https://www.canada.ca/en/health-canada/services/environmental-workplace-health/reports-publications/radiation/radon-reduction-guide-canadians-health-canada-2013.html
Health Canada. (n.d.). Reducing Radon Levels in Your Home. Retrieved from https://www.canada.ca/en/health-canada/services/health-risks-safety/radiation/radon/reducing-levels-home.html
Health Canada. (n.d.). Guide for Radon Measurements in Residential Dwellings. Retrieved from https://www.canada.ca/en/health-canada/services/publications/health-risks-safety/guide-radon-measurements-residential-dwellings.html
Health Canada. (n.d.). Justification and Policy Rationales for the Radon Guideline. Retrieved from https://www.canada.ca/en/health-canada/services/health-risks-safety/radiation/radon/action-guides/justification-policy-rationales.html
Take Action on Radon. (2024). Reducing Radon. Retrieved from https://takeactiononradon.ca/protect/reducing-radon/
RadonReduction.ca. (n.d.). Frequently Asked Questions About Radon. Retrieved from https://radonreduction.ca/frequently-asked-radon-questions/
Natural Resources Canada. (n.d.). Energy Efficiency Regulations for Heat Recovery Ventilators. Retrieved from https://natural-resources.canada.ca/energy-efficiency/energy-efficiency-regulations/recovery-ventilators
Pembina Trails School Division. (n.d.). Remedial Action for Radon. Retrieved from https://www.pembinatrails.ca/remedial-action
Calgary Radon Detection. (n.d.). Calgary Radon Mitigation Cost. Retrieved from https://calgaryradondetection.com/blog/calgary-radon-mitigation-cost/
HomeStars. (n.d.). Radon Mitigation System Cost Guide. Retrieved from https://www.homestars.com/demolition-disposal/price-guides/radon-mitigation-system-cost
Radon‑86. (n.d.). How Much Does Radon Testing and Mitigation Cost?. Retrieved from https://www.radon-86.ca/blog/how-much-does-radon-testing-and-mitigation-cost